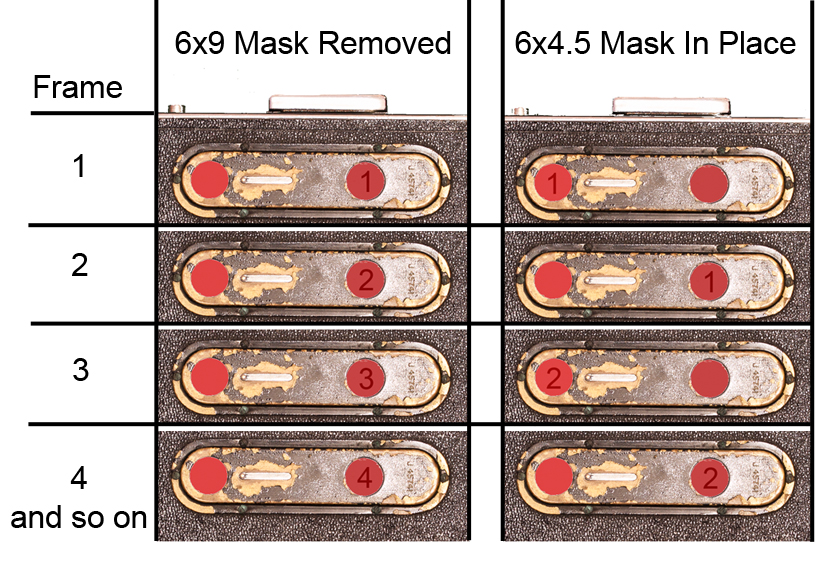
The Ensign Selfix 320 is a popular medium format folding camera that can be used to take both 6×4.5 and 6×9 cm photographs. However, some users are unsure which frame window to use for each format. This post will provide a clear and concise answer to this question. The photo below illustrates where to advance film for each format, 6×4.5 and 6x9cm
To use the Ensign Selfix 320 in 6×4.5 cm format, place the loose frame mask into the film chamber. After loading film into the camera, simply advance until the number 1 is in the left frame window, then after taking the picture advance the number 1 to the right frame window, repeating the same for all 12 numbers. To use the camera in 6×9 cm format, remove frame mask, if in place, line up the film numbers in the right frame window only.
It is important to note that it is very easy to make double exposures with the Ensign Selfix 320. To avoid this, be sure to advance the film after each exposure. You can do this by turning the film advance lever located on the right side of the camera.
The Ensign Selfix 320 is a great camera for both beginners and experienced photographers. It is easy to use and produces high-quality images. If you are looking for a medium format folding camera, the Ensign Selfix 320 is a great option.
I hope this post has been helpful. If you have any further questions about the Ensign Selfix 320, please feel free to contact me, or leave a reply below.
For more information about the Ensign Selfix 320, please visit the Camera Wiki website. This website provides a comprehensive overview of the camera, including its history, specifications, and user discussions. Camera Wiki website – Ensign Selfix 320
Milly’s cameras are always pleased to receive feedback from customers and when Lee from Australia got in touch with us, we were delighted with his results. So much so, that we decided, with his permission to make this post about his restoration.
Lee tells us, being my 1st ever covering I found it a bit challenging. Unlike the Rolleiflex that has real leather that comes off in one piece. The Minolta TLR covers are delicate and well glued in random places. To overcome this problem I removed all the old crispy leatherette with a bamboo barbecue stick and then proceeded to clean the old glue with lighter fluid.
Working to a PDF print out of a template for the covers and using a rubbing technique with paper and pencil I was able to make paper cut outs. Using a set of vernier calipers I was able to make slight adjustments until I was happy with the fit. I didn’t want to make a mistake working with the leather as this would be irreversible and making paper templates first seemed the best way to go, especially without having the original covers to work from.
Once I was completely happy I moved on to using the newly made templates for cutting the leather. I started by sticking double sided adhesive tape on the back of the paper templates to stop them from moving while I cut. The tools I used for cutting were a combination of fine tip scalpel and a pair of fine tip scissors. The film back holes were made with multi belt hole cutters and for the circles I used a draft compass with a rotating wheel adjuster that locks in place with a super fine needle point. I had to customise the compass by replacing the drawing lead with a stainless steel needle for wool sewing, this I sharpened to a razor to use for the cutter. As I envisaged this worked well and made light work of the job in hand.
The next thing that needed attention was the back door, the black paintwork was scuffed and damaged in places. So before placing the new covers I resprayed it.
Once dried the covers were stuck in place and then the job of resembling the camera took place.
Lee tells us that his Minolta Autocord needed some TLC and was in need of being brought back to life, we think he has certainly achieved his goals and it looks stunning in red leather, well done Lee! For anyone interested the red leather and other colours can be purchased from here.
Below is taken from McKeown’s Price Guide To Antique & Classic Cameras 1996-97
“There are 24 different models of Minolta 6X6 TLRs. Any internal or external change is considered to be a new model of that camera. All use either 120 or 220 rollfilm and have f3.5/75mm lenses. The shutters are Konan, Citizen, Sekosha, and Optiper.”
Lee’s camera is the non-metered Autocord RA model that was produced around 1958 for the export market.
The Autocord was Minolta’s equivalent of the Rolliecord, and in some respects was better than the Rolleicord. The infamous Rokkor lens is said to be that bit better than the Zeiss Tessar found on Rolleicord’s, with that in mind I leave you with two sample images taken by Lee with his lovely restored Minolta TLR.
Photos in this post remains the copyrights of Lee Lira and should not be used without contacting him first.
I was not going to add this to the website at first. Then I discovered a couple of negatives sat on top of each other still in the print frame. The glass was cracked, the leather that joined the two lifting doors to the rear was rotten. Other than this it was in rather good condition.
I am slowly gathering items to put together for when I start alternative printing processes. I thought this early 1900’s Kodak No. 1 Panoram Print Frame would come in handy. The print area is 65x190mm and was designed to take the negatives from the Kodak No. 1 Panoram Camera, which I might add is a very interesting camera. The No.1 camera took 112 degree images, 2 1/4×7 inches large on No. 105 roll film.
Unfortunately I don’t have this camera, although my beady eye is very much open to finding one. What I do have is a KMZ, (Krasnogorsk) FT2 Panoramic Camera. A.K.A Russian Tank Camera. It takes 12 24x110mm exposures on a length 35mm film. My idea is to use this print frame for these negatives and 6×9, (60x90mm) like the ones I found in the frame.
The repair was rather quick and simple. First off I cleaned off the old leather which was originally used as an hinge. I then cut some new leather from my stock of camera leather, (available via my shop). I then attached the new leather and headed off to the glass shop for some 2mm picture framing glass. Be careful not to buy glass that has UV protection as it will take you weeks to expose your prints. The broken glass measured 2.7mm thick so I guess that greenhouse glass which is ever so slightly thicker at 3mm would be OK. Should I break the 2mm glass then I will try the green house glass.
So what about the negatives I found? Well, I decided to scan them and while they were nothing special one I thought was kind of interesting. It was taken at a guess in the 1940-50’s and is of an old radio on a table with a vase of flowers on top. Unfortunately the negatives were either under or over exposed and rather tatty. Only three of the four scanned and are below for you to view. It would be nice to know of the real date, where they were taken, by whom or better still the camera used. Still its a nice find never the less.
How re-skinning a Praktica MTL3 SLR film camera in a luxurious camera leather can be both rewarding and a great upgrade. The Praktica MTL3 and MTL5 early models are both very easy cameras to re-skin. Earlier models didn’t have a self timer to cut out and the old skins lift very easy. Before we delve into the steps involved please do follow the instructions carefully. Take great care as you go, knives are sharp and cleaning products can do damage as well as clean. Like other online tutorial websites a disclaimer to take notice of; Milliy’s Cameras can and will not be held responsible for any accidents or damages to persons or goods, to follow this tutorial is at your own risk. To undertake this tutorial is acceptance of Milly’s Cameras disclaimer.
Window Cleaner or Lighter Fluid, (Highly Flammable so please take care).
Clean cloth
The first task is to remove the old covers. An easy way to do this would be to gently lift one corner of the old skins and then peel. Being careful not to stretch the cover as you pull. Stretched skins as a cutting template later for the new covers will not produce great looking replacement covers. Take your time and be gentle with them. The front covers have a thin sliver of metal which packs out a step in the body, see photos to the right, No. 1 and 2. Most of the time these come off with the skin, usually stuck to the adhesive side. Gently peel them off and place them to one side. We will need these for later and replaced using double sided tape to do so.
Once the skins are all removed the next step is to clean all the old adhesive off the camera body. The old adhesive on some camera models can be easily done by rubbing with a finger. The friction from rubbing helps the adhesive to roll off. I have had a couple stubborn cameras where a cleaning product was needed. For this purpose I find petrol lighter fluid, (naphtha) to be an asset. I do have some customers who tell me they use a window cleaner like Windex. I have yet to try this. Windex would be the safest out of the two to use as great care has to be taken because of the flammability of naphtha.
Once the camera is clean start to apply double sided tape to the back of the old covers. Use a knife to trim the edges before removing the backing. As seen in the photo to the right. –>
After removing the double sided tape backing and before placing the old cover down on the leather sheet. I place them with adhesive side down on my jumper, t-shirt or jeans. This is to pick up small fibers and make the adhesive less sticky. This will help us to part from the leather after cutting the new covers. Once you have done this you can place the cover down on to the leather for cutting around.Before cutting make sure you have a new blade in your knife, a sharp blade produces clean cuts and a reduction in mistakes.
Cut all of the skins needed before fitting and take your time. Once completed remove the old skins from the newly cut leather skins. Fitting the new skins is a slight art and the best way I’ve found to do this. Would be, remove the adhesive protection backing using the blade of the knife to separate. This can be a fiddly job so take your time and if it don’t want to separate move to a different corner and try again.
I tend to start with the rear panel and then move on to the front panels. Now starting at the hinge, lay the rear panel so that it is level and aligned correctly. As you lay it, begin to smooth it out also. Starting at the hinge and rubbing away to the other end of the door catch. The idea here is to not get any trapped air which will cause air bubbles. The adhesive on Milly’s Cameras leather is formulated to form a strong bond under pressure. Pressure applied to the surface, so that the harder you push the better it will bond. Care is taken to not damage your camera by pushing too hard in a sensitive area. One time I accidentally pushed my finger through a film view window. Luckily I only make such mistakes once before learning to take more care and less haste.
Moving on to the front covers again remove the backing paper first with a blade. Like old postage stamps, the best way to lay the front skins would be to lick the adhesive. Just a centimeter or two on the edge. The edge that will but up to the lens mount housing. This will temporarily deactivate the adhesive so you can slide it in to the correct position. The adhesive is non toxic so your tongue won’t fall off or develop any oddities. Once in place begin doing the same as the rear panel, gently lay and rub outwards to the side of the camera. The part you licked will take about 15 to 20 minutes to dry and can be pushed down to adhere to the body once this time has passed. Finishing both of the front panels your of your camera should now look like mine in the photographs below. Below sporting their new camera leather. Please note that I have many camera leather and leatherette available to choose from so you don’t have to go with burgundy as I did. The choice is yours to make. Have fun!
Camera light seals are straightforward and require no real skill to replace. To prove this my eight-year-old son has achieved camera light seal replacement with great success, under a little guidance of course!
Please do follow the instructions carefully and take great care as you go; knives are sharp and cleaning products can do damage. As with many online tutorials, please observe the following disclaimer: Milly’s Cameras cannot be held responsible for any accidents or damages to persons or goods, so please use this tutorial at your discretion.
Window Cleaner or Lighter Fluid, (Highly Flammable so please take care).
Tweezers
Clean Cloth
Masking/Decorators Tape
The green lines on the following photos show where the old light seal foam will need cleaning. Usually, I start by placing masking tape over the opening for the shutter curtains. Be careful not to press onto the curtains and focus solely on the outer frame; this helps to stop old sticky light seal foam from entering this area and jamming the curtains.
Then, using the window cleaner or lighter fluid, I start cleaning to begin to soften the light seal foam. Make sure you do not flood the area, rather you just need enough product to help loosen the old foam. With the use of a cloth, start to clean the hinge area and backdoor. Once clean, I use a toothpick to focus on the thin channels (top and bottom of the film compartment). This step is time consuming and can be tricky so be patient and avoid rushing.
The final areas to clean are the door and catch area, as seen in the photo above. Once all of the areas listed are cleaned – with the exception of the mirror damper which we will address later – you are ready to start cutting new light seal foam.
Cutting the light seal foam is relatively simple and doesn’t require a laser cutter, as is sometimes assumed. For the cutting, we will start with the channels and will be using the 1.5mm closed cell for these tracks.
There are two main reasons for using the closed cell over any other foam. Firstly, my foam is modern foam that will do the same job as the original foam compared to compression values and also by density in blocking the light. The closed cell also has the added bonus of high resistance to avoid it perishing over time. The other main reason is that it can be easily cut by hand to extremely thin strips; in the case of this camera to 1.75mm in width as seen in the photo’s to the right.
One tip for my customers is to use a scalpel with a new blade and a steel ruler. Using the appropriate tools – and avoiding scissors, craft/hobby knives, kitchen knives or any other inappropriate cutting implement – is my best advice on how to cut the foam successfully. I begin by cutting the tracks for the top and bottom channels. You will need to use the 1.5mm closed cell foam, cutting two strips 1.75mm wide and 1.48mm long. These will need to be trimmed further to allow for the film counter pin on the top channel and the film canister cut out for the bottom channel.
Cut 9mm off the end of one of the strips and place this piece in the top channel, from the door hinge to the film counter pin. To place these strips in the tracks, remove the adhesive backing and lick the adhesive. This will deactivate the adhesive long enough to allow you to position the foam correctly with the use of a toothpick.
Once the saliva has dried, which will take approximately 20 minutes, the foam can be pushed down so that the adhesive makes contact. Remove 5mm off the rest of the trimmed strip and disregard this small piece. Place the rest of the strip in the top channel, starting from the other side of the camera.
Again use your saliva to deactivate the adhesive and push in using a toothpick. Repeat the above steps for the bottom channels. Cut the strip down to two pieces, one at 1.22mm and the other 17mm long. The 17mm long piece will go from the left hand side to the cut out for the film canister; the other piece will go from the door hinge end back to the cut out.
Next, cut two pieces from the 3mm open cell foam, 49mm x 6.5mm for the door hinge and 49mm x 6mm for the door at the catch end. Remove adhesive backing sheet and stick in place. Please note that there are two small pieces either side of the catch which need to be cut from the 1.5mm foam. The sizes for these are 4mm x 24mm and 4mm x 18mm. To stick these in place, remove the backing and give the adhesive a lick and then position using tweezers. 3mm foam may seem too thick for these areas – and with standard foams it usually is – however my open cell foam has a good compression rate with a minimal stress factor and a high cell count to block light while still compressing down to 0.3mm (-+0.1mm).
The next step is to do the mirror damper foam, which requires great care to be taken. One friend once told me that he placed paper inside the mirror housing to stop old foam from falling inside however I strongly urge you not to do this; this can actually cause more damage than sticky foam will. Having replaced 1000s of mirror damper foam, care and patience is all that is needed to avoid any issues.
My technique is to place the camera in one hand and hold it up over scrap paper, high enough for me to see what I am doing. With the other hand, I use a toothpick to scrape the old foam away, letting it fall onto the scrap paper. Once all the lose is removed, I use my scalpel and tweezers to further clean the area. Though do remember to change the scalpel blade and clean the tweezers after using them!
Once clean, cut a replacement piece from the 3mm. The piece should be 38mm x 3mm. Once cut, remove the back, lick and use the tweezers to place the foam in its correct place.
Once this is done, remove the masking/decorator’s tape and give the camera a light clean. And voila! Your Fujica ST605 is finished and ready to load up with film to test.