Posted on 1 Comment

A Panoramic Medium Format Camera Is Born – F.A.C II

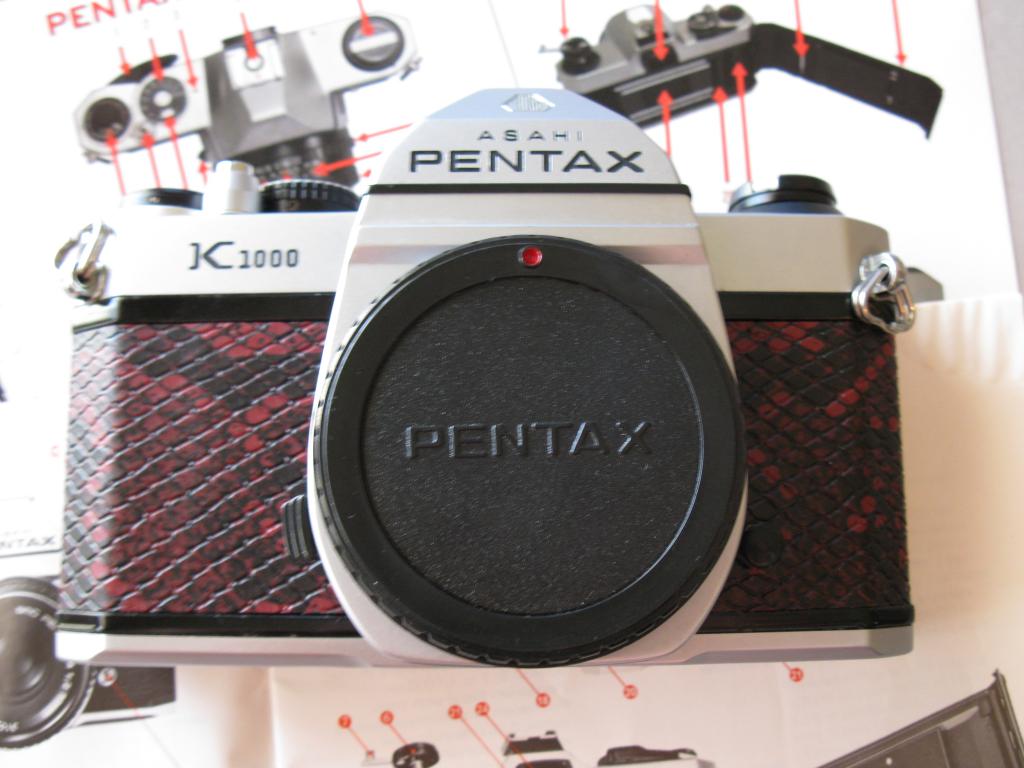
Last month I made a post about the recovering of a Minolta Autocord by Lee Lira from Australia. The post can be found here: Link to Lee’s Minolta Autocord post. Since posting, Lee’s been busy making by hand a Panoramic Medium Format Camera. When he told me that he intended to do this, I replied that it would be great to see what could be obtained from such a camera. His returning email had an attachment from his Mark I camera.

A black and white photograph from the Fac 1 film camera. A hand made panoramic film camera by Lee Lira

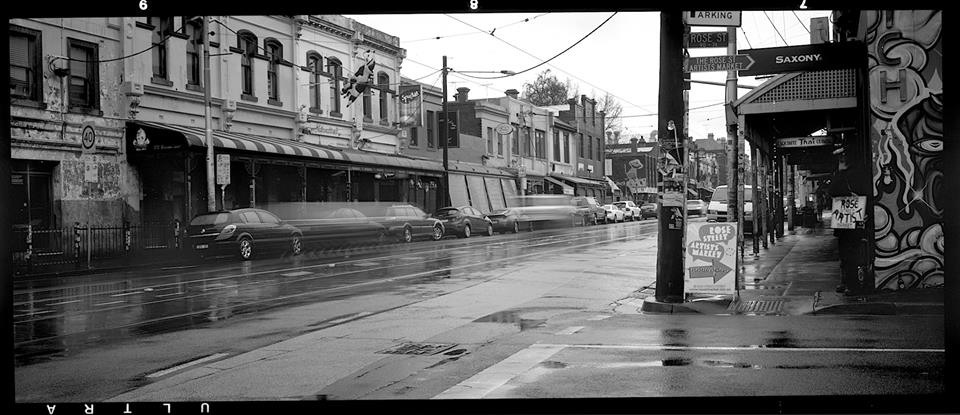
Wow! What a camera! Lee built the Mark I camera using a 1959 Schneider Symmar 135mm f/5.6/235mm f/12. lens. FFD was initially set at 131mm, which is great for distance shots. Though after a few experiments Lee moved this forward to 133mm to achieve a bit of hyper focal.  A huge improvement he tells me. Take a look at that scan above. I’m sure like me you will find yourself totally agreeing with him.

A photograph of the hand made panoramic film camera by Lee Lira

The bits & bobs came from a Horseman 6X9 Press back & a Graflex viewfinder. Lee did have to play around with homemade masks. These took a bit of time until he had them nailed.

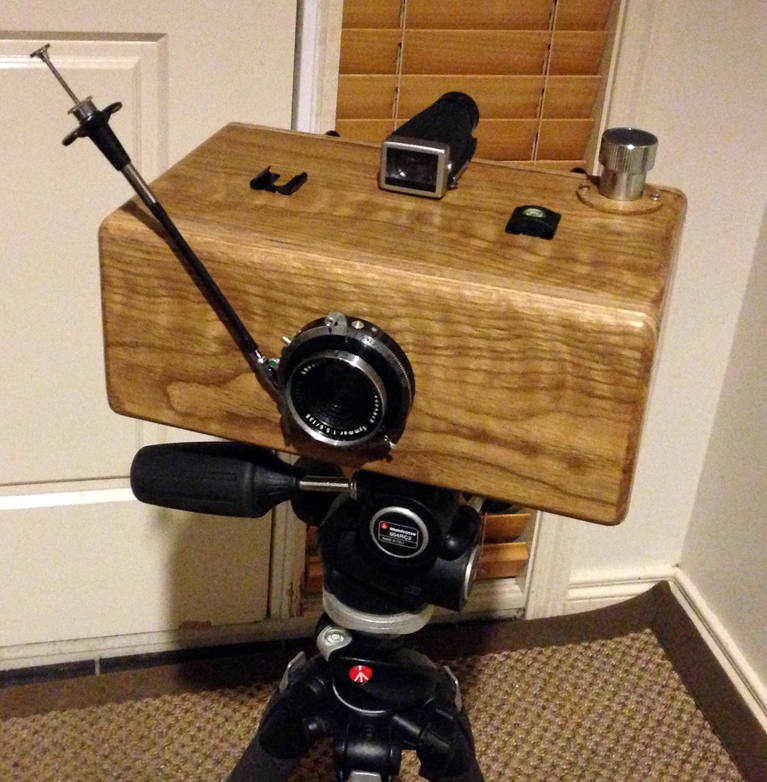
Moving on to the FAC Mark II, I watched in awe the speedy development of this camera, the pace that Lee works is lightning fast indeed. Going by the emails, I roughly worked it out to be around 4 weeks from start to finish. This was not including planing or the purchasing of parts. The body of the Mark II is handmade and beautifully sculptured from 19mm Redgum hardwood, “extremely hardwood” Lee tells me.

A photograph of the FAC Mark II panoramic film camera being made by Lee Lira

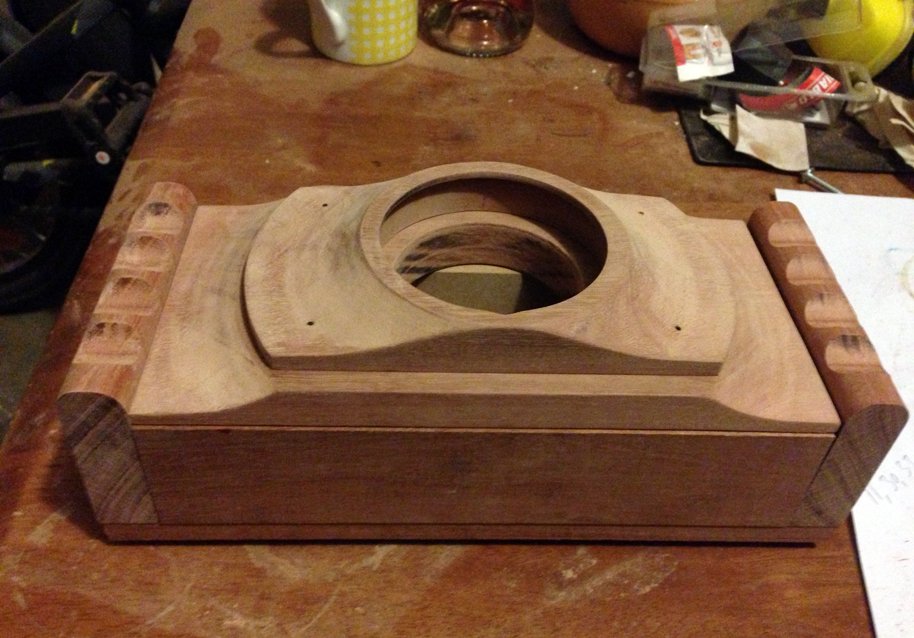
All glued and screwed, my love of woodwork is just a hobby, Lee tells me.  And I think you will agree, it’s something he executes well. So much so, that I plan to ask him if he would like to undertake a small commission.

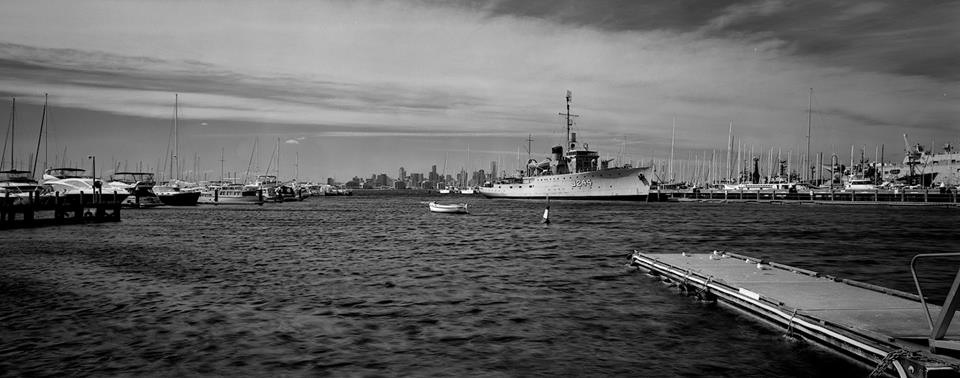
The lens for the Mark II is a 1985 Schneider Super Angulon 90mm f8 in a Copal shutter, giving an image circle of 197mm. This will allow an impressive 6X14 format using 120 roll film. Wow!

A photograph of FAC Mark II panoramic film camera finished and on a tripod. By Lee Lira.

The first test results from the camera in my opinion were very good, but Lee did say he noticed a small amount of flare and the lens needed slightly adjusting to achieve better focusing.

Photograph showing inside the film chamber of the Fac mark II panoramic film camera. Made by Lee Lira.

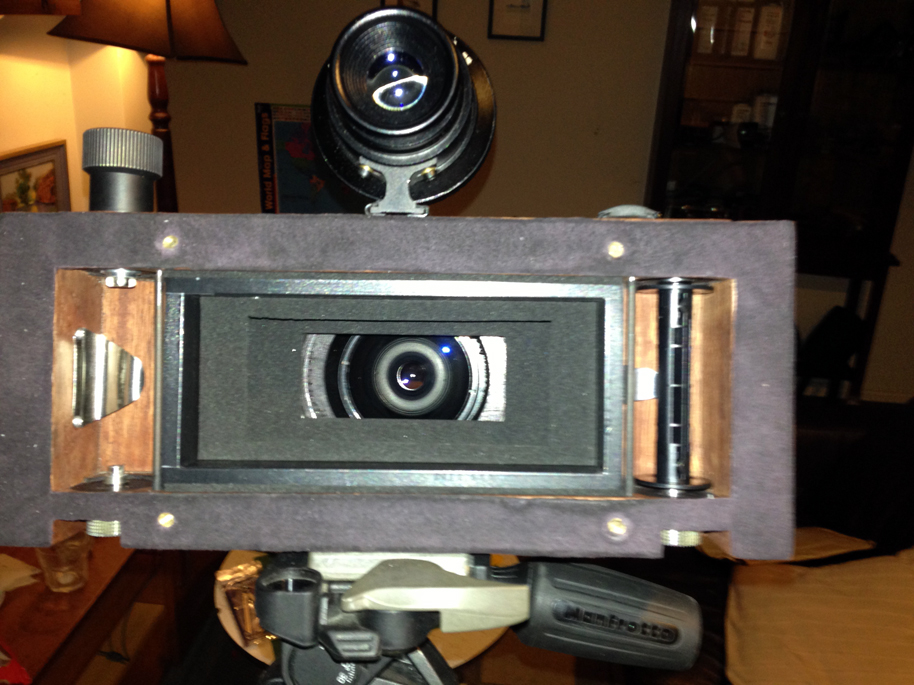
With the help of my camera flock material and film camera light seal foam flare was eliminated. Lee with his keen eye for detail and determination adjusted the lens to achieve the desired focal placement of the lens, the results certainly speak for themselves.

The first Black and White sample photograph from the Fac mark II panoramic film camera. Made by Lee Lira.

The second Black and White sample photograph from the Fac mark II panoramic film camera. Made by Lee Lira.

The third Black and White sample photograph from the Fac mark II panoramic film camera. Made by Lee Lira.

The forth Black and White sample photograph from the Fac mark II panoramic film camera. Made by Lee Lira.

All photos in this post remain the copyrights of Lee Lira and should not be used without his consent.

To see more great photo’s from this camera and Lee; www.facebook.com/foundmelbourne

Posted on Leave a comment

Asahi Pentax Spotmatic SP Test Roll Review

Ashi Pentax Spotmatic SP with Carl Zeiss Pancola 50mm 1:8 lens I recently bought this film camera to replace my beloved Canon FTb QL. The FTb decided to stop working and the rewind mechanism slipping. I decided it was best to replace it and fix the FTb at a later date once I had more time. I used my FTb mostly with M42 lenses via the Canon P adapter and as I don’t have a huge collection of Canon FD glass, I decided it best to go for a Pentax Spotmatic as a replacement.

I was looking for a Pentax Spotmatic F but then this very tidy Pentax SP caught my eye. Already serviced, all speeds checked and adjusted where needed, I just could not resist it.  I bought it a week before the Gosporteers Auto Show, the same show that I did a test review of the Fujica ST605 twelve months ago. I thought what a great show to test the camera out at, and maybe I should do these reviews every year.

The Pentax Spotmatic SP is the same size than the Canon but oddly it’s body weighs slightly less. One thing you notice straight away is the Pentax has no flash hot-shoe, this is not a problem as there is an adapter that just slots over the eye window and plugs into the sync sockets on the front of the body. Let’s not compare too much technical differences, as there aren’t a great deal, but lets look at how the camera felt and performed in comparison. Loading film is different and I have to say I prefer the simplicity of Pentax over, Canon’s “has it grabbed the film” Quick Load system.

With my beloved Fomapan 200 loaded in the camera and my Carl Zeiss 50mm Pancolar attached, off I went looking for vehicles to photograph. The camera felt nice to hold and I especially liked the way it felt robust like a tank.

Hot Rod black and white photograph taken with Ashi Pentax Spotmatic SP with Carl Zeiss Pancola 50mm 1:8 lens

The meter gets some getting use to, there is a switch on the side of lens housing that one has to press to activate it. This switch also stops down the aperture when using the lens in Auto mode.  I like the idea of having both functions on one switch but I found myself thumbing around looking for the switch while framing my shot. Aside from getting use to the placement of the switch, the camera is very easy to use and I really could not fault it in any big way.

Hot Rod manifold black and white photograph taken with Ashi Pentax Spotmatic SP with Carl Zeiss Pancola 50mm 1:8 lens

Unlike, when using a M42 adapter, where sometimes the lens unscrews when focusing, this never happened once with the Spotmatic. I did kind of expect it to, as the 50mm Pancolar has developed a stiff focus ring of late. This I realised straight away because it annoys me so much when it happens, especially when your time has passed with that would be great shot, if  only you weren’t faffing around with the lens.

Vintage car convertible black and white photograph taken with Ashi Pentax Spotmatic SP with Carl Zeiss Pancola 50mm 1:8 lens

If I had to sum up the two cameras, I think I would say that the Canon is the slightly easier camera to use. This is simply because the meter and stop down button on the Canon is activated by pushing the self timer arm towards the lens housing. To me this seems such a natural place to have it and is easier to find when framing a shot. That said I do like the build of the Pentax SP, it is a very solid camera and I feel it will go on working for many years to come. For me this makes this camera a keeper!

Vintage car chrome spoke wheel black and white photograph taken with Ashi Pentax Spotmatic SP with Carl Zeiss Pancola 50mm 1:8 lens

Test Roll;

  • Fomapan 200
  • Rated @ 160

Develop details;

  • d-23 1:3
  • 21c
  • 17 minutes
  • Agitation first 30 seconds then once every minute

Lens used;

  • Carl Zeiss Pancolar 50mm 1:8
Posted on Leave a comment

Minolta Autocord Red Leather Custom Covers

Milly’s cameras are always pleased to receive feedback from customers and when Lee from Australia got in touch with us, we were delighted with his results. So much so, that we decided, with his permission to make this post about his restoration.

Lee tells us, being my 1st ever covering I found it a bit challenging. Unlike the Rolleiflex that has real leather that comes off in one piece. The Minolta TLR covers are delicate and well glued in random places. To overcome this problem I removed all the old crispy leatherette with a bamboo barbecue stick and then proceeded to clean the old glue with lighter fluid.

Working to a PDF print out of a template for the covers and using a rubbing technique with paper and pencil I was able to make paper cut outs. Using a set of vernier calipers I was able to make slight adjustments until I was happy with the fit. I didn’t want to make a mistake working with the leather as this would be irreversible and making paper templates first seemed the best way to go, especially without having the original covers to work from.

Once I was completely happy I moved on to using the newly made templates for cutting the leather. I started by sticking double sided adhesive tape on the back of the paper templates to stop them from moving while I cut. The tools I used for cutting were a combination of  fine tip scalpel and a pair of fine Minlota Autocord TLR Restorationtip scissors. The film back holes were made with multi belt hole cutters and for the circles I used  a draft compass with a rotating wheel adjuster that locks in place with a super fine needle point. I had to customise the compass by replacing the drawing lead with a stainless steel needle for wool sewing, this I sharpened to a razor to use for the cutter. As I envisaged this worked well and made light work of the job in hand.

The next thing that needed attention was the back door, the black paintwork was scuffed and damaged in places. So before placing the new covers I resprayed it.
Once dried the covers were stuck in place and then the job of resembling the camera took place.

Lee tells us that his Minolta Autocord needed some TLC and was in need of being brought back to life, we think he has certainly achieved his goals and it looks stunning in red leather, well done Lee! For anyone interested the red leather and other colours can be purchased from here.

Minlota Autocord TLR Red Leather

Below is taken from McKeown’s Price Guide To Antique & Classic Cameras 1996-97
“There are 24 different models of Minolta 6X6 TLRs. Any internal or external change is considered to be a new model of that camera. All use either 120 or 220 rollfilm and have f3.5/75mm lenses. The shutters are Konan, Citizen, Sekosha, and Optiper.”

Lee’s camera is the non-metered Autocord RA model that was produced around 1958 for the export market.

The Autocord was Minolta’s equivalent of the Rolliecord, and in some respects was better than the Rolleicord. The infamous Rokkor lens is said to be that bit better than the Zeiss Tessar found on Rolleicord’s, with that in mind I leave you with two sample images taken by Lee with his lovely restored Minolta TLR.

Photos in this post remains the copyrights of Lee Lira and should not be used without contacting him first.

Posted on 2 Comments

Kodak D-23 Developer

Kodak D23Recently I have been experimenting with mixing my own developers, something that should be done with great care I might add.

My intentions were to find a better developing partner for Fomapan 200, (35mm format). I had up until a few weeks back been using Kodak D-76, and while I had great results with other films I felt it didn’t quite work with Fomapan 200. My negatives looked very flat, with little contrast. So much so that I even played with developing times and dilutions, but I just could not achieve what I was looking for. What I was trying to achieve was a more contrasty image that held detail in the highlights and shadows. As most of my photographs are scanned and used online, I could of quite easily manipulate them digitally. Unfortunately this for me was not the answer as it defeats the whole object of shooting with film in the first place. I find that this method also degrades the quality of the end image. After much reading and experimentation it seems I had discovered the Holy Grail of developers, that being Kodak D-23. This developer was introduced by Kodak in 1944 and is obviously no longer produced by them, which has been the case for some decades. So mixing it oneself is the only way to go.

Using D-23 stock solution in ratios of  1:1 dilution of water, I found it to produce a fine grain negative with very little fog and soft contrast with deep blacks in the shadows. This for me was OK but I still wanted a bit more contrast, so I then tried D-23 with a 1:3 dilution of water. Obviously development times are longer but the results achieved were just what I wanted. Nice and contrasty, with not too much grain, yet still an image with sharpness and detail in the highlights and shadows.

Bridge Tavern Old Portsmouth Kodak D-23 1:3So what is D-23 chemically? Well surprisingly there is only 2 compounds which make up the developer, Sodium Sulphite the preservative and accelerator for the developing agent and Metol the developing agent. The formula is as follows and should be mixed in the order shown;

  • 500ml water
  • Metol 7.5 g
  • Sodium Sulphite (anhydrous) 100 g
  • Water to make up to 1 Litre

Ropes Kodak D-23 3:1

It’s recommended that the developer be used as a one shot, throwing it away after developing. Though mixing at 1:3 means that it is very economical. So economical in fact, that it will happily develop 13 rolls of 35mm, and because of the high content of Sodium Sulphite it keeps in stock solution for a month or more.

What more could one possible ask for in a developer?

Posted on Leave a comment

Pentax K1000 Red & Black Snake Custom Covers

Pentax K1000 by Chris MacWe’ve got a new customer from down under! Chris, from outback Australia, is an avid photographer and collector. He’s sent us photos of his Pentax K1000 sporting our Red & Black Snake skin leatherette.

His skills at cutting and recovering cameras are exceptional. As the photos clearly show, his attention to detail is that of a true craftsman. Great work, Chris!

While Chris’s interest in cameras is purely recreational, it has attracted the attention of his friends who have requested his services. This isn’t at all surprising but is clear recognition of Chris’s skill.

Chris’s talents have been honed for many years, but anyone from newbie to expert can get into camera recovery. Recent messages from other customers have asked how to cut new skins for a given camera and ensure they fit perfectly. One way is to examine the original skins and, if they fit well and can be removed from the camera without stretching, simply use them as a template. A tutorial for this method can be found here.

Pentax K1000 by Chris Mac

But what if the original body covers don’t fit very well? If this is the case, then decorators’ masking tape can be used to fill in the gaps. Simply, stick it on the original skins, cut the edge of the tape to where the covers should be and then remove.

If you do stretch the skins, the best thing then is to make paper templates. This is a slow process but good results can be achieved through this route. Here at HQ we often use this method to ensure a tight fit.

And what if your camera has no skins? In this circumstance, the solution is to make paper templates and use them as guides for cutting the leather/leatherette.


Pentax K1000 by Chris Mac

There are plenty more tutorials coming soon to help others with camera recovering and fitting new camera light seals. Plus, Chris is going to provide us with tutorials based on his experience of recovering Pentax K1000 cameras. These will include information on the tools he has fashioned for the process, preparation of a K1000 for recovery, and the recovery of his much-loved models. Camera advice from 9,000 miles away!

If you have any photos of your own experiences, we’d love to see them. Get in touch via our contact page. We look forward to your submissions!


Photos in this post remain copyright property of Chris McNamara and must not be used without his consent. All rights reserved.