Camera light seals are straightforward and require no real skill to replace. To prove this my eight-year-old son has achieved camera light seal replacement with great success, under a little guidance of course!
Please do follow the instructions carefully and take great care as you go; knives are sharp and cleaning products can do damage.
As with many online tutorials, please observe the following disclaimer: Milly’s Cameras cannot be held responsible for any accidents or damages to persons or goods, so please use this tutorial at your discretion.
Time Taken; 40 minutes
Tools and Materials needed;
- 3mm Open Cell Camera light Seal Foam
- 1.5mm Closed Cell Camera light Seal Foam
- Sharp Knife, Steel Ruler and Cutting Mat. A safety cutting guide is available here by clicking this link
- Tooth or Bamboo Chop stick
- Window Cleaner or Lighter Fluid, (Highly Flammable so please take care).
- Tweezers
- Clean Cloth
- Masking/Decorators Tape
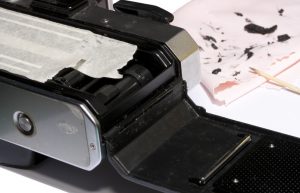
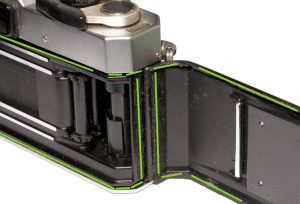
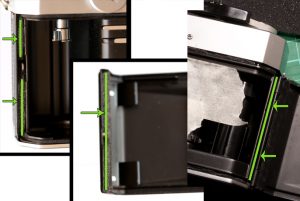
The green lines on the following photos show where the old light seal foam will need cleaning. Usually, I start by placing masking tape over the opening for the shutter curtains. Be careful not to press onto the curtains and focus solely on the outer frame; this helps to stop old sticky light seal foam from entering this area and jamming the curtains.
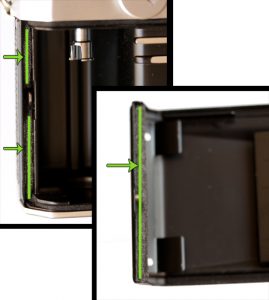
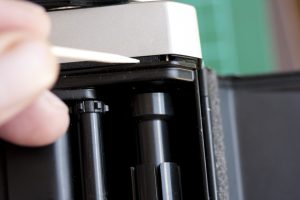
Then, using the window cleaner or lighter fluid, I start cleaning to begin to soften the light seal foam. Make sure you do not flood the area, rather you just need enough product to help loosen the old foam. With the use of a cloth, start to clean the hinge area and backdoor. Once clean, I use a toothpick to focus on the thin channels (top and bottom of the film compartment). This step is time consuming and can be tricky so be patient and avoid rushing.
The final areas to clean are the door and catch area, as seen in the photo above. Once all of the areas listed are cleaned – with the exception of the mirror damper which we will address later – you are ready to start cutting new light seal foam.
Cutting the light seal foam is relatively simple and doesn’t require a laser cutter, as is sometimes assumed. For the cutting, we will start with the channels and will be using the 1.5mm closed cell for these tracks.
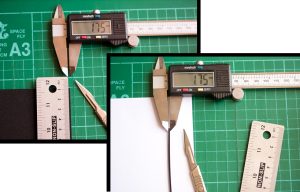
There are two main reasons for using the closed cell over any other foam. Firstly, my foam is modern foam that will do the same job as the original foam compared to compression values and also by density in blocking the light. The closed cell also has the added bonus of high resistance to avoid it perishing over time. The other main reason is that it can be easily cut by hand to extremely thin strips; in the case of this camera to 1.75mm in width as seen in the photo’s to the right.
One tip for my customers is to use a scalpel with a new blade and a steel ruler. Using the appropriate tools – and avoiding scissors, craft/hobby knives, kitchen knives or any other inappropriate cutting implement – is my best advice on how to cut the foam successfully.
I begin by cutting the tracks for the top and bottom channels. You will need to use the 1.5mm closed cell foam, cutting two strips 1.75mm wide and 1.48mm long. These will need to be trimmed further to allow for the film counter pin on the top channel and the film canister cut out for the bottom channel.
Cut 9mm off the end of one of the strips and place this piece in the top channel, from the door hinge to the film counter pin. To place these strips in the tracks, remove the adhesive backing and lick the adhesive. This will deactivate the adhesive long enough to allow you to position the foam correctly with the use of a toothpick.
Once the saliva has dried, which will take approximately 20 minutes, the foam can be pushed down so that the adhesive makes contact. Remove 5mm off the rest of the trimmed strip and disregard this small piece. Place the rest of the strip in the top channel, starting from the other side of the camera.
Again use your saliva to deactivate the adhesive and push in using a toothpick. Repeat the above steps for the bottom channels. Cut the strip down to two pieces, one at 1.22mm and the other 17mm long. The 17mm long piece will go from the left hand side to the cut out for the film canister; the other piece will go from the door hinge end back to the cut out.
Next, cut two pieces from the 3mm open cell foam, 49mm x 6.5mm for the door hinge and 49mm x 6mm for the door at the catch end. Remove adhesive backing sheet and stick in place. Please note that there are two small pieces either side of the catch which need to be cut from the 1.5mm foam. The sizes for these are 4mm x 24mm and 4mm x 18mm. To stick these in place, remove the backing and give the adhesive a lick and then position using tweezers. 3mm foam may seem too thick for these areas – and with standard foams it usually is – however my open cell foam has a good compression rate with a minimal stress factor and a high cell count to block light while still compressing down to 0.3mm (-+0.1mm).
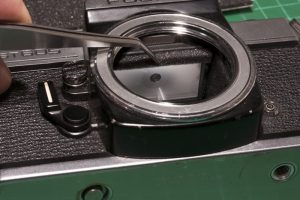
The next step is to do the mirror damper foam, which requires great care to be taken. One friend once told me that he placed paper inside the mirror housing to stop old foam from falling inside however I strongly urge you not to do this; this can actually cause more damage than sticky foam will. Having replaced 1000s of mirror damper foam, care and patience is all that is needed to avoid any issues.
My technique is to place the camera in one hand and hold it up over scrap paper, high enough for me to see what I am doing. With the other hand, I use a toothpick to scrape the old foam away, letting it fall onto the scrap paper. Once all the lose is removed, I use my scalpel and tweezers to further clean the area. Though do remember to change the scalpel blade and clean the tweezers after using them!
Once clean, cut a replacement piece from the 3mm. The piece should be 38mm x 3mm. Once cut, remove the back, lick and use the tweezers to place the foam in its correct place.
Once this is done, remove the masking/decorator’s tape and give the camera a light clean. And voila! Your Fujica ST605 is finished and ready to load up with film to test.



Hello Darron,
Thank you for directing me to your website and this tutorial, it’s just what I wanted to see and read.
I’ve saved your website details and should I need anything else will come to you direct unless you would prefer me to use eBay.
Many thanks for your help.
Brian G.
Thank you, Brian,
Should you need any further help, then please ask. I look forward to serving you again from either platform.
Enjoy your day.
Kind Regards
Darron
Hi Darron,
Thanks for such a detailed article, it’s been of real help.
In the mirror cavity of my ST605 not only the “front” damper foam is crumbling, but also the two strips on the sides at the top (next to the focusing screen). Should I care about those? They seem quite difficult to replace.
In my professional opinion, it is indeed advisable to address the condition of these side strips. While they may appear challenging to replace, it is best to entrust this task to a skilled camera technician who possesses the necessary tools, expertise, and knowledge to handle such intricate repairs around the focusing screen, condensing lens and pentaprism prism above. They will be equipped to navigate the complexities involved and ensure a proper functioning of the camera.
By seeking the assistance of a qualified professional, you can have peace of mind knowing that the repair will be conducted with precision and care, preserving the integrity of your ST605 camera.