Posted on Leave a comment

Pentax K1000 Red & Black Snake Custom Covers

Pentax K1000 by Chris Mac
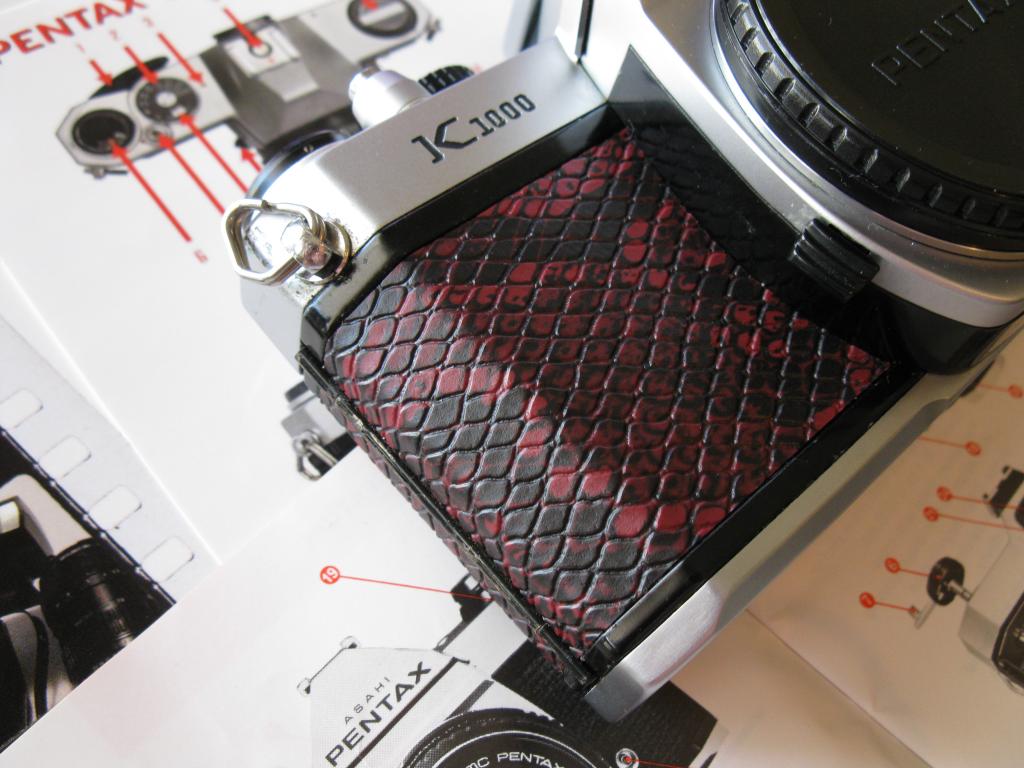
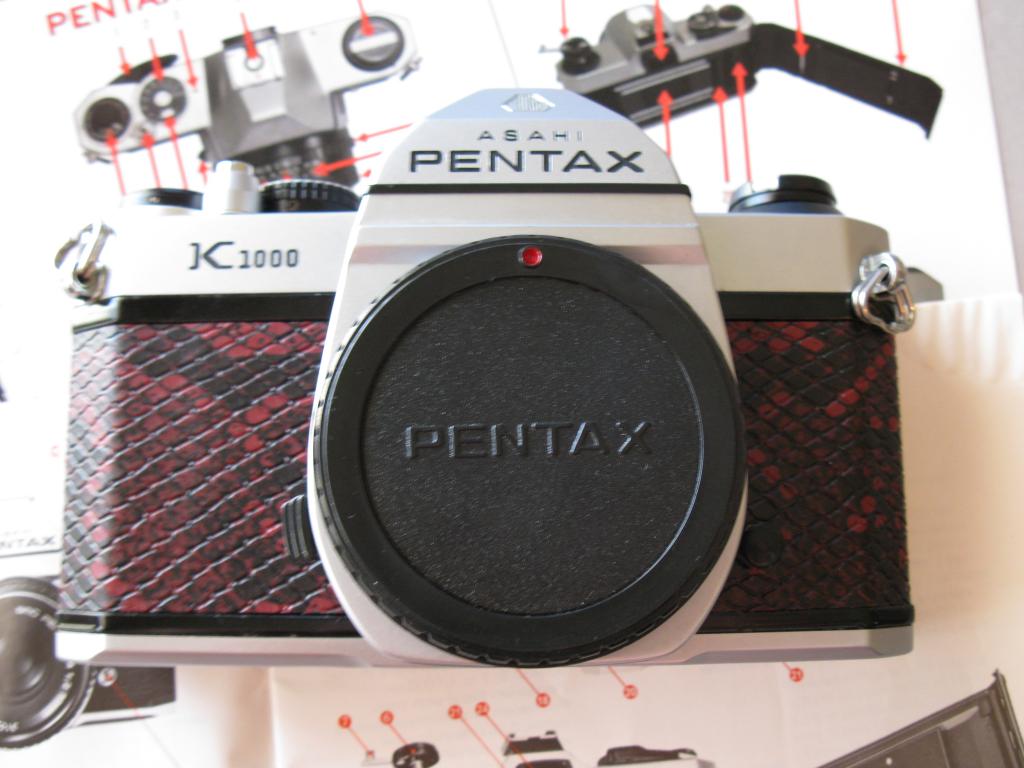
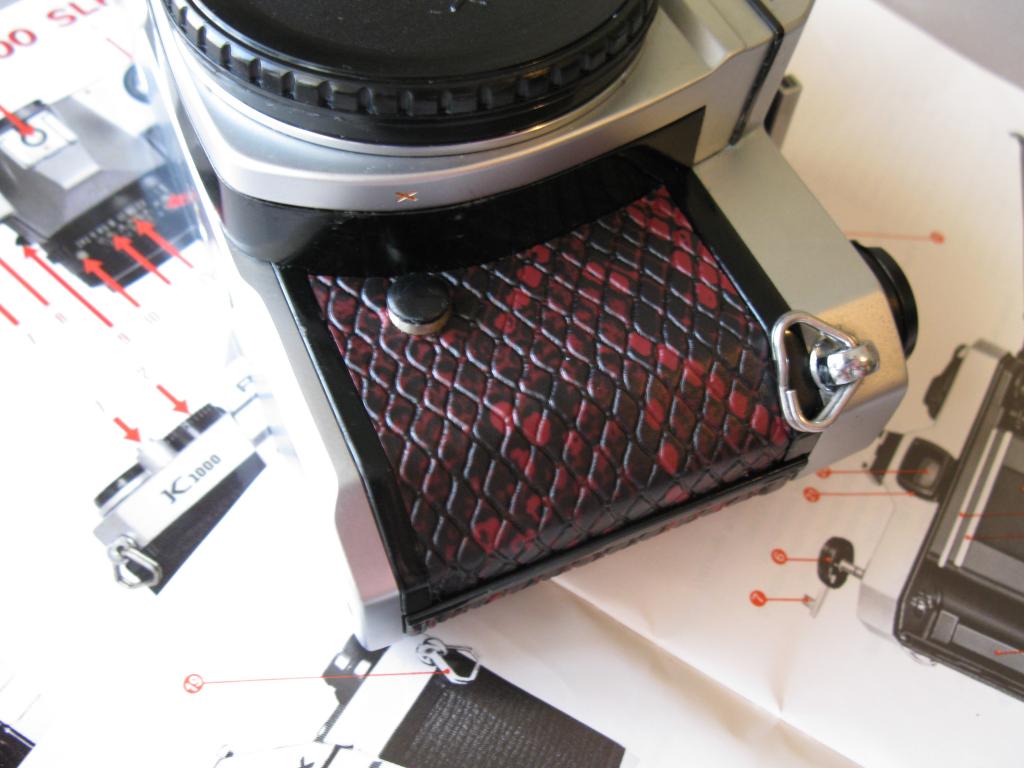
We’ve got a new customer from down under! Chris, from outback Australia, is an avid photographer and collector. He’s sent us photos of his Pentax K1000 sporting our Red & Black Snake skin leatherette.

His skills at cutting and recovering cameras are exceptional. As the photos clearly show, his attention to detail is that of a true craftsman. Great work, Chris!

While Chris’s interest in cameras is purely recreational, it has attracted the attention of his friends who have requested his services. This isn’t at all surprising but is clear recognition of Chris’s skill.

Chris’s talents have been honed for many years, but anyone from newbie to expert can get into camera recovery. Recent messages from other customers have asked how to cut new skins for a given camera and ensure they fit perfectly. One way is to examine the original skins and, if they fit well and can be removed from the camera without stretching, simply use them as a template. A tutorial for this method can be found here.

Pentax K1000 by Chris Mac

But what if the original body covers don’t fit very well? If this is the case, then decorators’ masking tape can be used to fill in the gaps. Simply, stick it on the original skins, cut the edge of the tape to where the covers should be and then remove.

If you do stretch the skins, the best thing then is to make paper templates. This is a slow process but good results can be achieved through this route. Here at HQ we often use this method to ensure a tight fit.

And what if your camera has no skins? In this circumstance, the solution is to make paper templates and use them as guides for cutting the leather/leatherette.


Pentax K1000 by Chris Mac

There are plenty more tutorials coming soon to help others with camera recovering and fitting new camera light seals. Plus, Chris is going to provide us with tutorials based on his experience of recovering Pentax K1000 cameras. These will include information on the tools he has fashioned for the process, preparation of a K1000 for recovery, and the recovery of his much-loved models. Camera advice from 9,000 miles away!

If you have any photos of your own experiences, we’d love to see them. Get in touch via our contact page. We look forward to your submissions!


Photos in this post remain copyright property of Chris McNamara and must not be used without his consent. All rights reserved.


Posted on 2 Comments

Voigtlander Vito I

Early Voigtlander Vito IThe Voigtlander Vito I, a film camera I’ve had knocking around for some time. It’s been collecting dust on my desk for far longer than I would like to admit to. The Voigtlander Vito I was bought with the intention of a some use and passing it on to a new owner. That was until I discovered that there was a problem with the shutter. The slow speeds were very slow, too slow. Slow to the point of being able to make a cup of tea during what should of been a 2 second exposure. I might be quick at making a brew, but not that quick!

Fully aware that this Vito was an early version,  (probably pre-war). It also has the better of the shutters available around the time of manufacturing. This shutter being the Dial Set Compur, also known as the Rim Set Compur. I do like these, they are a master piece of skilled working parts. Unfortunately it came to me without the yellow filter that is normally permanently hinged to the shutter bezel. The yellow filter was fitted to help reduce flaring, especially with the lens being un-coated. The chrome work was also a bit aged and looking tatty. It’s unappealing looks is why it sat on my desk for sometime as a dust collecting paper weight.

Having never owned or ever used a Voigtlander Vito before, I was somewhat attracted due to the unknowing factor of discovery. The Voigtlander Vito never really appealed to me like some cameras do. Those with good looks or a reputation, that are too good to let pass. Last week I found myself looking at this Vito in a different light. It caught my eye a couple of times from a different angle, in a different light. I found myself promising to fix it and run a film through it. Today I did just that! I gave the dusty dry bellows a light check first. No point working on the shutter if the bellows look like they have been in a shoot out with Buggsy Malone. With the bellows checking out fine and in good health it was time to move on to the shutter. The shutter was in a bad state and needed to be stripped, cleaned and reassembled. I also cleaned the lens while I was at it, and this little film camera came out looking better than I first thought it would. I was very pleased and my desire grew rapidly to use it, I became very excited.

The first thing you will notice is that it has no rangefinder, so what’s a person to do? Go old school and try guessing, sorry make an educated guess.

OK so I wasted 28 exposures! Wait a minute, its not what you think. This camera is one of the most quirky little things I have ever used in a 35mm format, honestly! I lost potentially 28 exposures due to over lapping images, not quite full double exposures. The film counter was not very accurate a with hindsight I should of wound it on by two marks instead of one. Odd thing being, towards the end of the film I thought to wind it on by 3 marks just to be safe, just as well or it would of been the whole roll of film wasted. I say wasted, we all know it was a learning curve and not a real waste as such.

So what are my impressions of the Vito? It’s a bit hard to judge without getting to get to know the camera a little better but I will attempt to make a summery. A summery for the sake of this post. The Vito is what I would class as a true old school camera, and not one for the impatient photographer. Its a camera that forces you to think about each frame carefully and the steps involved. The greatest thing I struggled with was distance among all the other things. It went something like this;

  1. What’s to be in focus? OK that’s about 10 meters away
  2. Set focus to 10 meters
  3. Set aperture, (for required depth of field)
  4. Meter reading via handheld, (Sekonic in my case) no sunny 16 here I’m afraid. Not that brave yet!
  5. Set shutter speed
  6. Lift anti double exposure catch
  7. Advance film, (by two marks) 😉
  8. Take picture
  9. Shivering shark attack! I forgot to frame the image and move the camera accordingly. Its that easy to forget when its stuck on a tripod and your thinking about the operation of the camera. We’ve all been here and if not then you need to try this camera. It’s quirky yet a fun little camera to use.

Having enjoyed the Vito, and I do plan on running more film through it. I did feel its not a keeper, don’t misunderstand me, the lens is sharp, it’s small, compact and light. Even kinda classy looking, it’s growing on me. Unfortunately it takes too much brain power and will take time, a lot before getting constant results with it. If you like challenge then this is one sweet camera to add to your list, it will certainly not disappoint you.

Speaking of results here are the ‘not lapped’ photo’s from the test roll. I think they speak for themselves.

Black and white photograph taken with vintage Voigtlander Vito 1 of a farm barn and vehicle tire worn lane

Black and white photograph taken with voigtlander vito 1 film camera of a close up detail of brick and weathered old wood shiplap

A lack and white photograph taken with voigtlander vito 1 film camera. Photograph of front of a barn wickham hampshire area

A black and white photograph taken with voigtlander vito 1 film camera of a private sign on a gate to a field

Posted on Leave a comment

Contact Print Frame Repair

I was not going to add this to the website at first. Then I discovered a couple of negatives sat on top of each other still in the print frame. The glass was cracked, the leather that joined the two lifting doors to the rear was rotten. Other than this it was in rather good condition.

Eastman Kodak No. 1 Panoram camera Contact Print Frame

I am slowly gathering items to put together for when I start alternative printing processes. I thought this early 1900’s Kodak No. 1 Panoram Print Frame would come in handy. The print area is 65x190mm and was designed to take the negatives from the Kodak No. 1 Panoram Camera, which I might add is a very interesting camera. The No.1 camera took 112 degree images, 2 1/4×7 inches large on No. 105 roll film.

Vintage film negatives found in an old contact printing frame

Unfortunately I don’t have this camera, although my beady eye is very much open to finding one. What I do have is a KMZ, (Krasnogorsk) FT2 Panoramic Camera. A.K.A Russian Tank Camera. It takes 12 24x110mm exposures on a length 35mm film. My idea is to use this print frame for these negatives and 6×9, (60x90mm) like the ones I found in the frame.

Eastman Kodak No. 1 Panoram camera Contact Print Frame

The repair was rather quick and simple. First off I cleaned off the old leather which was originally used as an hinge. I then cut some new leather from my stock of camera leather, (available via my shop). I then attached the new leather and headed off to the glass shop for some 2mm picture framing glass. Be careful not to buy glass that has UV protection as it will take you weeks to expose your prints. The broken glass measured 2.7mm thick so I guess that greenhouse glass which is ever so slightly thicker at 3mm would be OK. Should I break the 2mm glass then I will try the green house glass.

Eastman Kodak No. 1 Panoram camera Contact Print Frame

So what about the negatives I found? Well, I decided to scan them and while they were nothing special one I thought was kind of interesting. It was taken at a guess in the 1940-50’s and is of an old radio on a table with a vase of flowers on top. Unfortunately the negatives were either under or over exposed and rather tatty. Only three of the four scanned and are below for you to view. It would be nice to know of the real date, where they were taken, by whom or better still the camera used. Still its a nice find never the less.

A vintage negative of a tree line found in an old contact printing frame

A vintage negative of a vase of flowers, radio and mirror found in an old contact printing frame

A vintage negative view from looking out of a window, found in an old contact printing frame

Posted on 3 Comments

Camera leather – Re-cover a Praktica MTL3

Praktica MTL3 Film Camera Recovered in a burgundy leather from Milly's Camera

How re-skinning a Praktica MTL3 SLR film camera in a luxurious camera leather can be both rewarding and a great upgrade. The Praktica MTL3 and MTL5 early models are both very easy cameras to re-skin. Earlier models didn’t have a self timer to cut out and the old skins lift very easy. Before we delve into the steps involved please do follow the instructions carefully. Take great care as you go, knives are sharp and cleaning products can do damage as well as clean. Like other online tutorial websites a disclaimer to take notice of; Milliy’s Cameras can and will not be held responsible for any accidents or damages to persons or goods, to follow this tutorial is at your own risk. To undertake this tutorial is acceptance of Milly’s Cameras disclaimer.

Time To Complete: 25 minutes

Tools and Materials List;

  • Camera Leather Sheet 0.5mm thick
  • Sharp Knife, Steel Ruler and Cutting Mat
  • Double Sided Tape 50mm wide
  • Window Cleaner or Lighter Fluid, (Highly Flammable so please take care).
  • Clean cloth
Removed old camera skins from a Praktica MTL 3 film camera

The first task is to remove the old covers. An easy way to do this would be to gently lift one corner of the old skins and then peel. Being careful not to stretch the cover as you pull. Stretched skins as a cutting template later for the new covers will not produce great looking replacement covers. Take your time and be gentle with them. The front covers have a thin sliver of metal which packs out a step in the body, see photos to the right, No. 1 and 2. Most of the time these come off with the skin, usually stuck to the adhesive side. Gently peel them off and place them to one side.  We will need these for later and replaced using double sided tape to do so.

Triming excess double sided tape for new camera skins for a Praktica MTL 3 film camera

Once the skins are all removed the next step is to clean all the old adhesive off the camera body. The old adhesive on some camera models can be easily done by rubbing with a finger. The friction from rubbing helps the adhesive to roll off. I have had a couple stubborn cameras where a cleaning product was needed. For this purpose I find petrol lighter fluid, (naphtha) to be an asset. I do have some customers who tell me they use a window cleaner like Windex. I have yet to try this. Windex would be the safest out of the two to use as great care has to be taken because of the flammability of naphtha.

Once the camera is clean start to apply double sided tape to the back of the old covers. Use a knife to trim the edges before removing the backing. As seen in the photo to the right. –>

Using old cover as a template to cut arround replacment camera leather

After removing the double sided tape backing and before placing the old cover down on the leather sheet. I place them with adhesive side down on my jumper, t-shirt or jeans. This is to pick up small fibers and make the adhesive less sticky.  This will help us to part from the leather after cutting the new covers. Once you have done this you can place the cover down on to the leather for cutting around.Before cutting make sure you have a new blade in your knife, a sharp blade produces clean cuts and a reduction in mistakes.

Cut all of the skins needed before fitting and take your time. Once completed remove the old skins from the newly cut leather skins. Fitting the new skins is a slight art and the best way I’ve found to do this.  Would be, remove the adhesive protection backing using the blade of the knife to separate. This can be a fiddly job so take your time and if it don’t want to separate move to a different corner and try again.

Separate the old cover from the newly cut camera leather

I tend to start with the rear panel and then move on to the front panels. Now starting at the hinge, lay the rear panel so that it is level and aligned correctly. As you lay it, begin to smooth it out also. Starting at the hinge and rubbing away to the other end of the door catch. The idea here is to not get any trapped air which will cause air bubbles. The adhesive on Milly’s Cameras leather is formulated to form a strong bond under pressure. Pressure applied to the surface, so that the harder you push the better it will bond. Care is taken to not damage your camera by pushing too hard in a sensitive area. One time I accidentally pushed my finger through a film view window. Luckily I only make such mistakes once before learning to take more care and less haste.

Moving on to the front covers again remove the backing paper first with a blade.  Like old postage stamps, the best way to lay the front skins would be to lick the adhesive.  Just a centimeter or two on the edge. The edge  that will but up to the lens mount housing. This will temporarily deactivate the adhesive so you can slide it in to the correct position. The adhesive is non toxic so your tongue won’t fall off or develop any oddities. Once in place begin doing the same as the rear panel, gently lay and rub outwards to the side of the camera. The part you licked will take about 15 to 20 minutes to dry and can be pushed down to adhere to the body once this time has passed. Finishing both of the front panels your of your camera should now look like mine in the photographs below. Below sporting their new camera leather. Please note that I have many camera leather and leatherette available to choose from so you don’t have to go with burgundy as I did. The choice is yours to make. Have fun!

Recovered Praktica MTL 3 Rear View with new luxurious burgundy camera leather

Recovered Praktica MTL 3 film SLR camera, side view showing close up of crisp detail new camera leather

Recovered Praktica MTL 3 SLR film camera front view with new crisp cut replacement camera leather. By Millys Cameras

Posted on 1 Comment

Replacement Camera Light Seal Foam – Mixed Selection

Replacement Camera Light Seal Foam - Mixed Selection

A great selection of replacement camera light seal foam all in one pack has now been added to the shop. I have taken great care and time to select the best camera seal foams available, these include open and closed cell foams both traditional and modern. This mixed selection pack is ideal as a first time buy to get a visual and feel for what camera light seal foam is available from me in larger sizes. It is also great if you have a few cameras that need new door light seals and mirror damper foam. Depending on cameras there should be enough to do approx. 8 cameras. All the different foams available in this pack can be purchased separately in larger sheet form up to A4 size, (210 x 300mm). Contained in the camera light seal pack is the following;

  • 2x 1.5mm closed cell foam, (1x self adhesive and 1x plain)
  • 2x 2mm closed cell foam, (1x self adhesive and 1x plain)
  • 2x 3mm open cell foam, (1x self adhesive and 1x plain)
  • 2x 5mm open cell foam, (1x self adhesive and 1x plain)
  • 1x 1mm felt, (self adhesive)
  • Each piece measures 150mm x 30mm

Quick link to this product; Camera replacement light seal foam – 9 piece selection pack

If you would like me to mix and match a pack of specific foams for you then this can be arranged via the contact form here, please include ‘Camera Light Seal Mixed Pack’ as the subject title. I also offer discounts on bulk buy for resellers again this can be arranged via the contact form here, please include ‘Camera Light Seal Reseller Question’ as the subject title. I will be only to happy to help.