Posted on 4 Comments

Fujica ST605 Test Roll Review

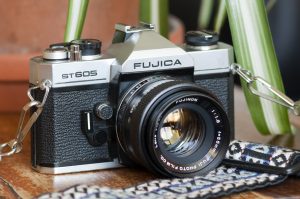
Fujica ST605 Vintage SLR Film Camera and Fujinon 55mm 1:8 Lens ReviewI recently bought this camera to purposely do a light seal replacement tutorial for a good customer. It sure was great fun to do, the tutorial can be seen here.

I enjoy using slr’s as a general walk around camera and especially for events/shows. Most often I will reach for my Canon FTb QL which I use with the P mount converter and Carl Zeiss lenses which have the M42 mount. A quick look in the local rag revealed the Gosporteers Auto Show coming up, personally I could not think of a better opportunity than to get acquainted with the Fujica ST605 and what a surprise it was!

The Fujica is noticeably smaller than the Canon but oddly it’s body weighs only 20g less, either that or I need a new set of scales. Let’s not compare the technical differences but just deal with how the camera felt and performed in comparison. Loading film is different and I have to say I prefer the simplicity of Fujica over Canon’s “has it grabbed the film” Quick Load system.

With film loaded in the camera and a nice original 70’s strap attached off I went looking for likely candidates to photograph. The camera felt great to hold and I was snapping away without familiarising myself with the operators manual, not many cameras you can do that with. The meter I found very simple to use, although I did forget to compensate for using 1.45v batteries. Unfortunately my test photo’s came out slightly underexposed, although one thing confirmed is that the replacement light seals were doing their job.

Taken with Fujica ST605 Vintage SLR film camera and Fujinon 55mm 1:8 Lens

I always like to use the depth of field focus button, its of great help in getting an idea of how much will be in focus and the Fujica has the button placed in a very comfortable position. Because it was a slightly over cast day with sudden bursts of sunlight, I shot mostly at large apertures and the DOF button was used quite a bit. I always find the Canon FTb stop down, (DOF) button or whatever you want to call it a bit cumbersome to use. So again this is a thumbs up for the Fujica.

1934 Austin Taken with Fujica ST605 Vintage SLR film camera and Fujinon 55mm 1:8 LensMy only gripe was when the sun did come out I found myself wanting to select a faster shutter speed while keeping a shallow DOF, unfortunately the Fujica ST605 fastest shutter speed is 1/700. This was very disappointing as I felt forced to use a smaller aperture which gave me an undesirable larger DOF. This is where the canon FTb has a slightly upper hand.

Ford Taken with Fujica ST605 SLR vitage camera and Fujinon 55mm 1:8 LensI have to admit though I’ve had great fun with this camera as you can see and that my perception of the older Fujica’s SLR’s has changed as a result of the ST506. In fact so much so that I am going to treat myself to the next model up, the higher end Fujica ST801 and only because it has the faster shutter speeds I was looking for on this camera.

Swamp Bitch Taken with Fujica ST605 vintage SLR film camera and Fujinon 55mm 1:8 LensI really didn’t expect much from this camera but the ST605 really does pack a punch for a medium end SLR and it certainly gives the canon FTb a run for its money. It really has made me think that if the ST 801 proves to be as good as its smaller sister then it might be goodbye to my old friend the FTb. That said I won’t sell the FTb as I’m sure I can find a box, cupboard or maybe draw to hide it in.

Austin Mini Taken with Fujica ST605 vintage SLR film camera and Fujinon 55mm 1:8 Lens

Test Roll;

  • Fomapan 200

Develop details;

  • d-76 1:3
  • 24c
  • 12 minutes
  • Agitation first 30 seconds then once every 30 seconds

Lens used;

  • Fujinon 55mm 1:8
Posted on 4 Comments

Fujica ST605 Camera Light Seal Replacement

Fujica ST605 Camera Light Seal Replacement

Camera light seals are straightforward and require no real skill to replace. To prove this my eight-year-old son has achieved camera light seal replacement with great success, under a little guidance of course!

Please do follow the instructions carefully and take great care as you go; knives are sharp and cleaning products can do damage.
As with many online tutorials, please observe the following disclaimer: Milly’s Cameras cannot be held responsible for any accidents or damages to persons or goods, so please use this tutorial at your discretion.

Time Taken; 40 minutes

Tools and Materials needed;

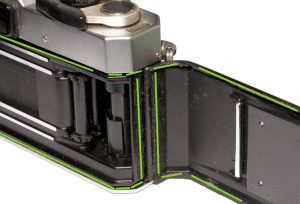
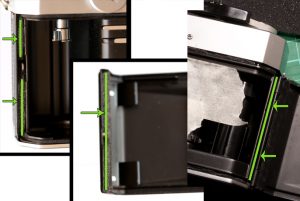
The green lines on the following photos show where the old light seal foam will need cleaning. Usually, I start by placing masking tape over the opening for the shutter curtains. Be careful not to press onto the curtains and focus solely on the outer frame; this helps to stop old sticky light seal foam from entering this area and jamming the curtains.

Fujica ST605 light seal replacement

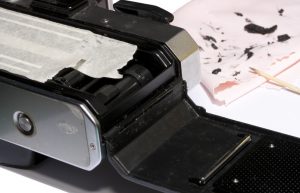
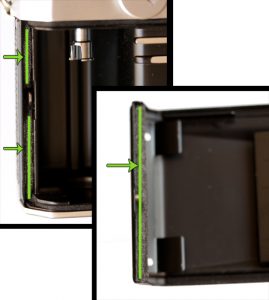
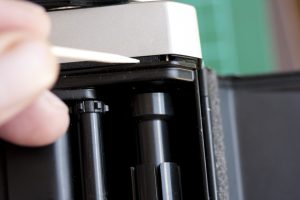
Then, using the window cleaner or lighter fluid, I start cleaning to begin to soften the light seal foam. Make sure you do not flood the area, rather you just need enough product to help loosen the old foam. With the use of a cloth, start to clean the hinge area and backdoor. Once clean, I use a toothpick to focus on the thin channels (top and bottom of the film compartment). This step is time consuming and can be tricky so be patient and avoid rushing.

Fujica ST605 light seal replacement

The final areas to clean are the door and catch area, as seen in the photo above. Once all of the areas listed are cleaned – with the exception of the mirror damper which we will address later – you are ready to start cutting new light seal foam.

Cutting the light seal foam is relatively simple and doesn’t require a laser cutter, as is sometimes assumed. For the cutting, we will start with the channels and will be using the 1.5mm closed cell for these tracks.

Cutting light seal foam thin strips

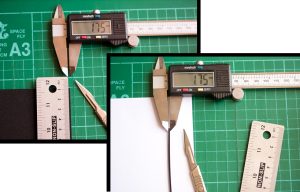
There are two main reasons for using the closed cell over any other foam. Firstly, my foam is modern foam that will do the same job as the original foam compared to compression values and also by density in blocking the light. The closed cell also has the added bonus of high resistance to avoid it perishing over time. The other main reason is that it can be easily cut by hand to extremely thin strips; in the case of this camera to 1.75mm in width as seen in the photo’s to the right.

One tip for my customers is to use a scalpel with a new blade and a steel ruler. Using the appropriate tools – and avoiding scissors, craft/hobby knives, kitchen knives or any other inappropriate cutting implement – is my best advice on how to cut the foam successfully.
I begin by cutting the tracks for the top and bottom channels. You will need to use the 1.5mm closed cell foam, cutting two strips 1.75mm wide and 1.48mm long. These will need to be trimmed further to allow for the film counter pin on the top channel and the film canister cut out for the bottom channel.

Fujica ST605 light seal replacement

Cut 9mm off the end of one of the strips and place this piece in the top channel, from the door hinge to the film counter pin. To place these strips in the tracks, remove the adhesive backing and lick the adhesive. This will deactivate the adhesive long enough to allow you to position the foam correctly with the use of a toothpick.

Once the saliva has dried, which will take approximately 20 minutes, the foam can be pushed down so that the adhesive makes contact. Remove 5mm off the rest of the trimmed strip and disregard this small piece. Place the rest of the strip in the top channel, starting from the other side of the camera.

Again use your saliva to deactivate the adhesive and push in using a toothpick. Repeat the above steps for the bottom channels. Cut the strip down to two pieces, one at 1.22mm and the other 17mm long. The 17mm long piece will go from the left hand side to the cut out for the film canister; the other piece will go from the door hinge end back to the cut out.

Next, cut two pieces from the 3mm open cell foam, 49mm x 6.5mm for the door hinge and 49mm x 6mm for the door at the catch end. Remove adhesive backing sheet and stick in place. Please note that there are two small pieces either side of the catch which need to be cut from the 1.5mm foam. The sizes for these are 4mm x 24mm and 4mm x 18mm. To stick these in place, remove the backing and give the adhesive a lick and then position using tweezers. 3mm foam may seem too thick for these areas – and with standard foams it usually is – however my open cell foam has a good compression rate with a minimal stress factor and a high cell count to block light while still compressing down to 0.3mm (-+0.1mm).

Fujica ST605 light seal replacement

The next step is to do the mirror damper foam, which requires great care to be taken. One friend once told me that he placed paper inside the mirror housing to stop old foam from falling inside however I strongly urge you not to do this; this can actually cause more damage than sticky foam will. Having replaced 1000s of mirror damper foam, care and patience is all that is needed to avoid any issues.

Camera mirror damper foam replacement

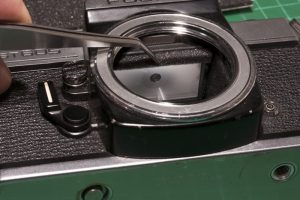
My technique is to place the camera in one hand and hold it up over scrap paper, high enough for me to see what I am doing. With the other hand, I use a toothpick to scrape the old foam away, letting it fall onto the scrap paper. Once all the lose is removed, I use my scalpel and tweezers to further clean the area. Though do remember to change the scalpel blade and clean the tweezers after using them!

Once clean, cut a replacement piece from the 3mm. The piece should be 38mm x 3mm. Once cut, remove the back, lick and use the tweezers to place the foam in its correct place.

Once this is done, remove the masking/decorator’s tape and give the camera a light clean. And voila! Your Fujica ST605 is finished and ready to load up with film to test.

Click to see test photo’s.