Posted on Leave a comment

Minolta Autocord Red Leather Custom Covers

Milly’s cameras are always pleased to receive feedback from customers and when Lee from Australia got in touch with us, we were delighted with his results. So much so, that we decided, with his permission to make this post about his restoration.

Lee tells us, being my 1st ever covering I found it a bit challenging. Unlike the Rolleiflex that has real leather that comes off in one piece. The Minolta TLR covers are delicate and well glued in random places. To overcome this problem I removed all the old crispy leatherette with a bamboo barbecue stick and then proceeded to clean the old glue with lighter fluid.

Working to a PDF print out of a template for the covers and using a rubbing technique with paper and pencil I was able to make paper cut outs. Using a set of vernier calipers I was able to make slight adjustments until I was happy with the fit. I didn’t want to make a mistake working with the leather as this would be irreversible and making paper templates first seemed the best way to go, especially without having the original covers to work from.

Once I was completely happy I moved on to using the newly made templates for cutting the leather. I started by sticking double sided adhesive tape on the back of the paper templates to stop them from moving while I cut. The tools I used for cutting were a combination of  fine tip scalpel and a pair of fine Minlota Autocord TLR Restorationtip scissors. The film back holes were made with multi belt hole cutters and for the circles I used  a draft compass with a rotating wheel adjuster that locks in place with a super fine needle point. I had to customise the compass by replacing the drawing lead with a stainless steel needle for wool sewing, this I sharpened to a razor to use for the cutter. As I envisaged this worked well and made light work of the job in hand.

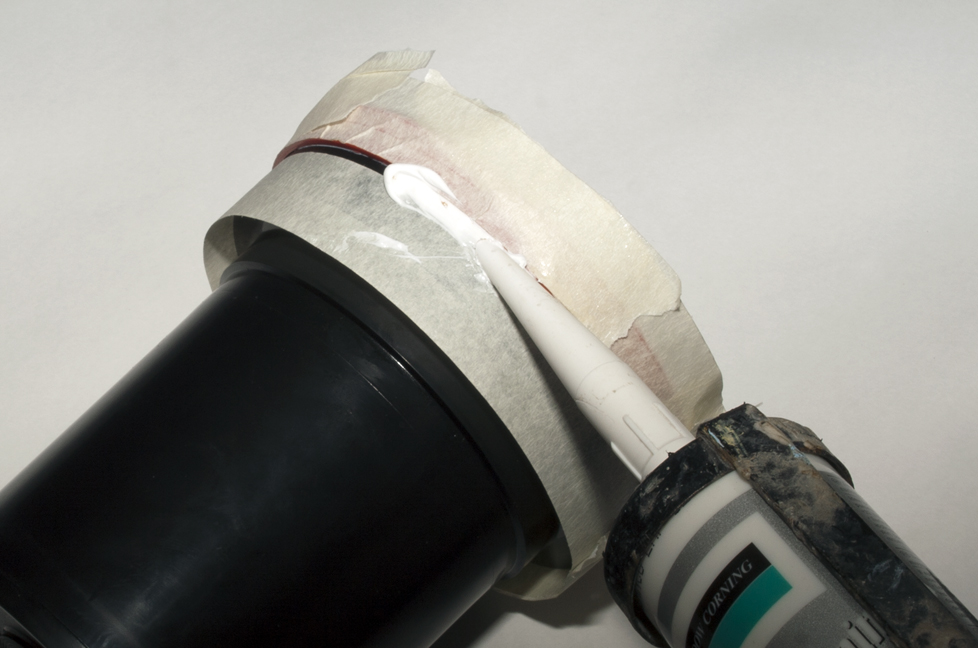
The next thing that needed attention was the back door, the black paintwork was scuffed and damaged in places. So before placing the new covers I resprayed it.
Once dried the covers were stuck in place and then the job of resembling the camera took place.

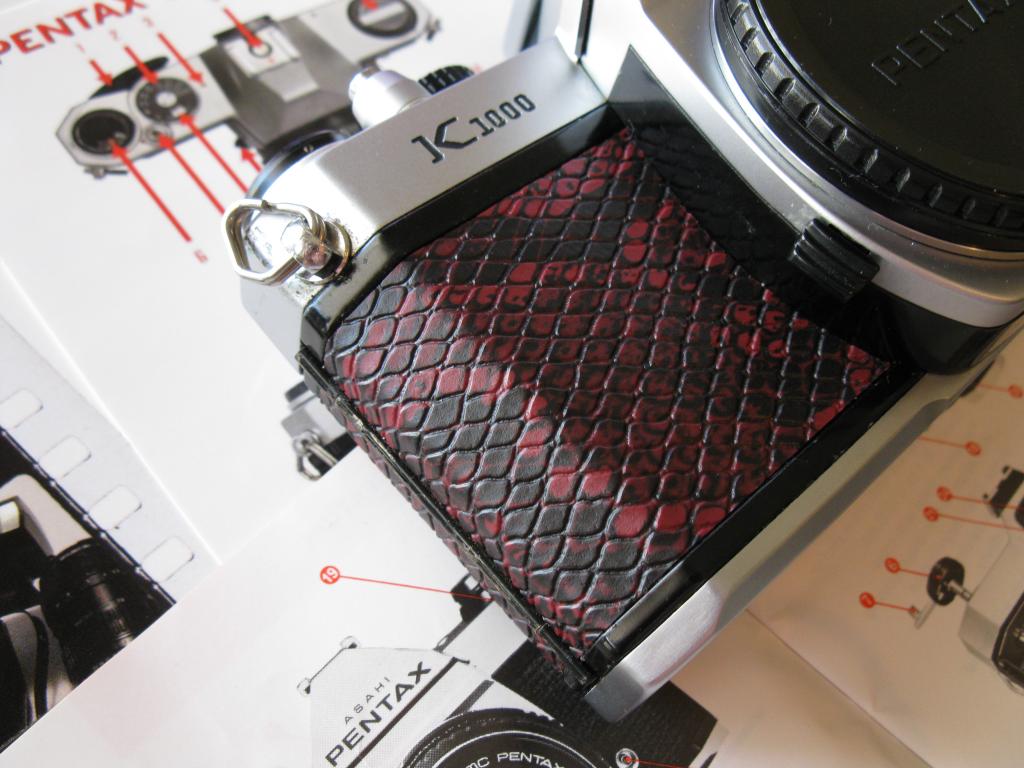
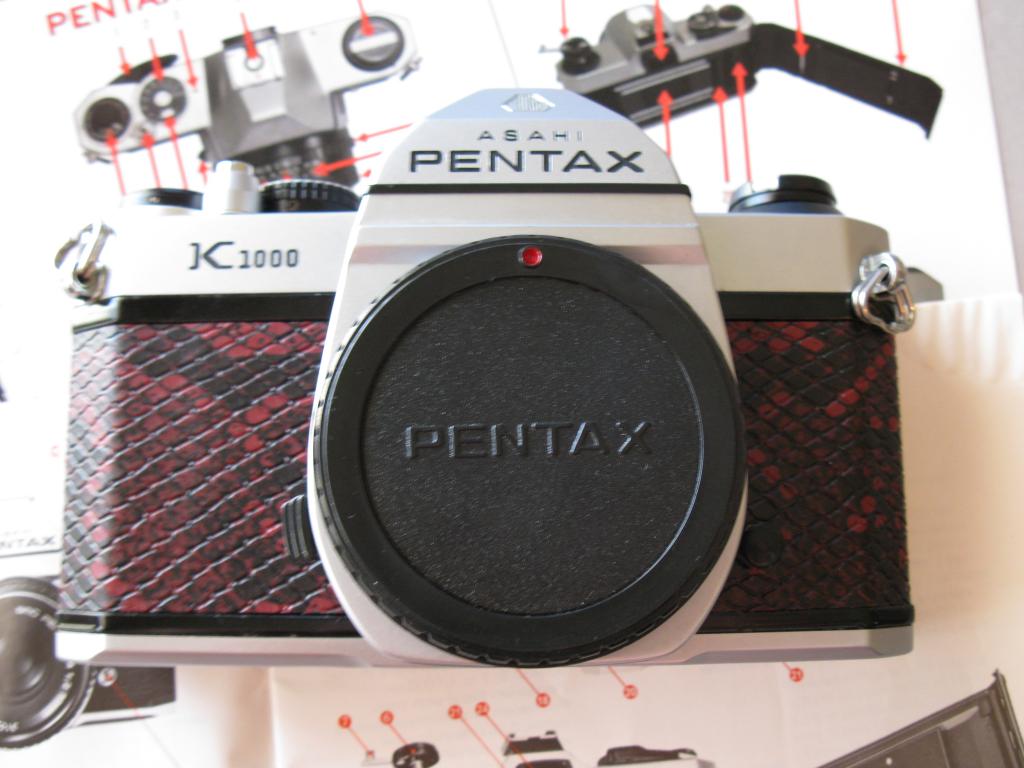
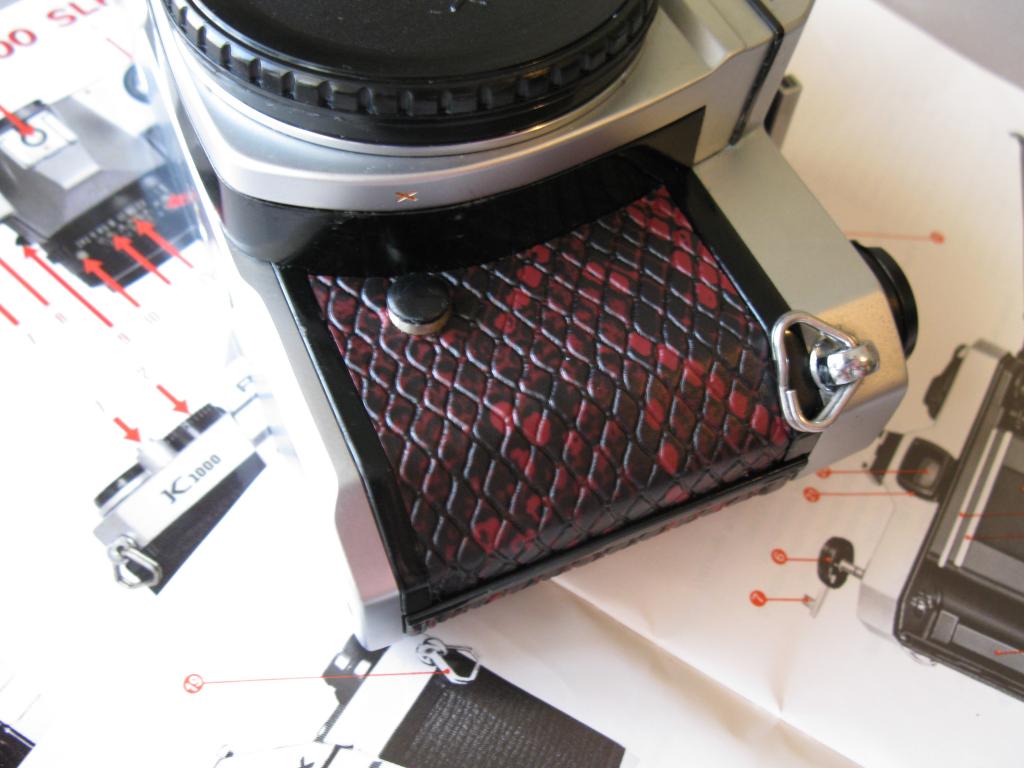
Lee tells us that his Minolta Autocord needed some TLC and was in need of being brought back to life, we think he has certainly achieved his goals and it looks stunning in red leather, well done Lee! For anyone interested the red leather and other colours can be purchased from here.

Minlota Autocord TLR Red Leather

Below is taken from McKeown’s Price Guide To Antique & Classic Cameras 1996-97
“There are 24 different models of Minolta 6X6 TLRs. Any internal or external change is considered to be a new model of that camera. All use either 120 or 220 rollfilm and have f3.5/75mm lenses. The shutters are Konan, Citizen, Sekosha, and Optiper.”

Lee’s camera is the non-metered Autocord RA model that was produced around 1958 for the export market.

The Autocord was Minolta’s equivalent of the Rolliecord, and in some respects was better than the Rolleicord. The infamous Rokkor lens is said to be that bit better than the Zeiss Tessar found on Rolleicord’s, with that in mind I leave you with two sample images taken by Lee with his lovely restored Minolta TLR.

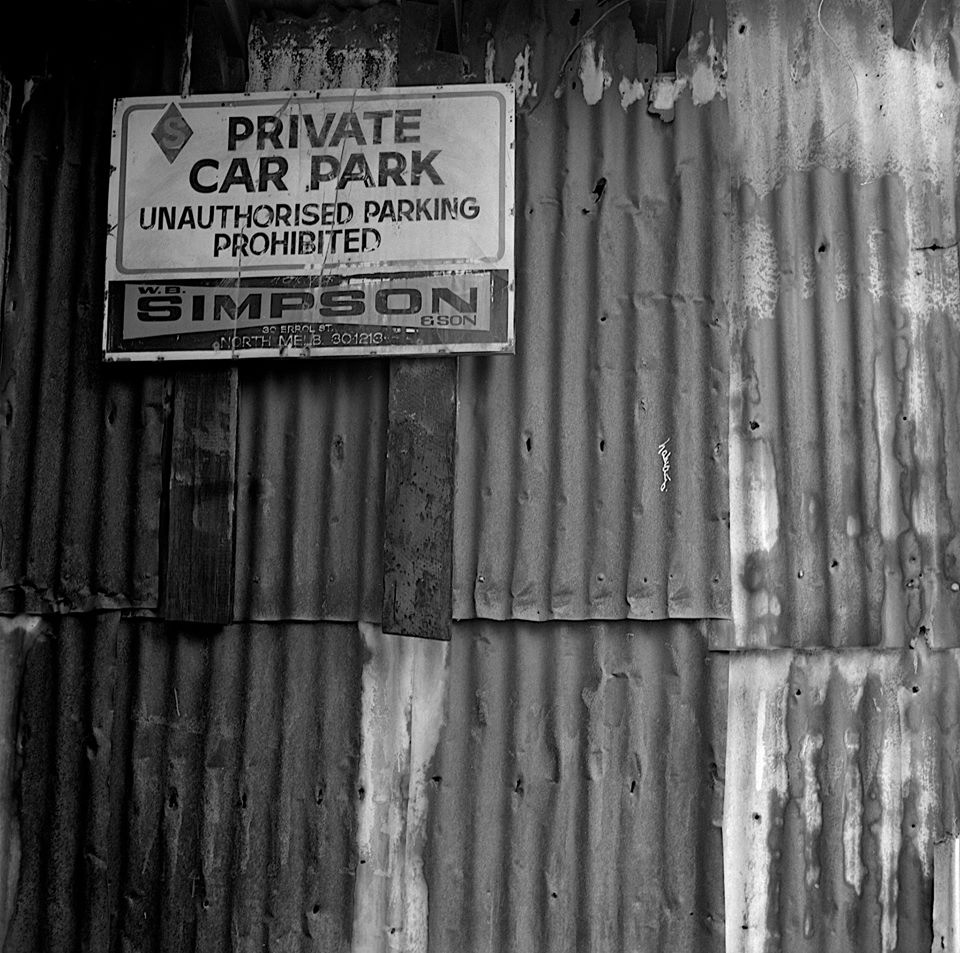
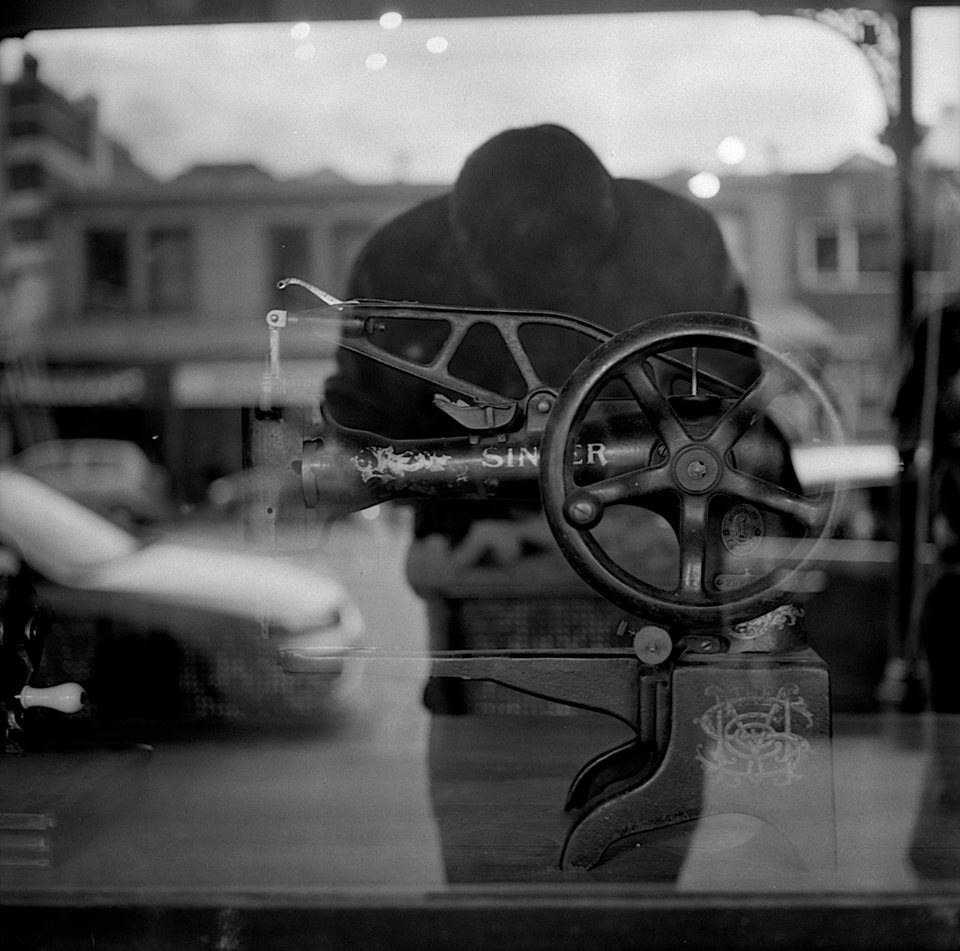
Photos in this post remains the copyrights of Lee Lira and should not be used without contacting him first.

Posted on Leave a comment

Pentax K1000 Red & Black Snake Custom Covers

Pentax K1000 by Chris MacWe’ve got a new customer from down under! Chris, from outback Australia, is an avid photographer and collector. He’s sent us photos of his Pentax K1000 sporting our Red & Black Snake skin leatherette.

His skills at cutting and recovering cameras are exceptional. As the photos clearly show, his attention to detail is that of a true craftsman. Great work, Chris!

While Chris’s interest in cameras is purely recreational, it has attracted the attention of his friends who have requested his services. This isn’t at all surprising but is clear recognition of Chris’s skill.

Chris’s talents have been honed for many years, but anyone from newbie to expert can get into camera recovery. Recent messages from other customers have asked how to cut new skins for a given camera and ensure they fit perfectly. One way is to examine the original skins and, if they fit well and can be removed from the camera without stretching, simply use them as a template. A tutorial for this method can be found here.

Pentax K1000 by Chris Mac

But what if the original body covers don’t fit very well? If this is the case, then decorators’ masking tape can be used to fill in the gaps. Simply, stick it on the original skins, cut the edge of the tape to where the covers should be and then remove.

If you do stretch the skins, the best thing then is to make paper templates. This is a slow process but good results can be achieved through this route. Here at HQ we often use this method to ensure a tight fit.

And what if your camera has no skins? In this circumstance, the solution is to make paper templates and use them as guides for cutting the leather/leatherette.


Pentax K1000 by Chris Mac

There are plenty more tutorials coming soon to help others with camera recovering and fitting new camera light seals. Plus, Chris is going to provide us with tutorials based on his experience of recovering Pentax K1000 cameras. These will include information on the tools he has fashioned for the process, preparation of a K1000 for recovery, and the recovery of his much-loved models. Camera advice from 9,000 miles away!

If you have any photos of your own experiences, we’d love to see them. Get in touch via our contact page. We look forward to your submissions!


Photos in this post remain copyright property of Chris McNamara and must not be used without his consent. All rights reserved.


Posted on 4 Comments

Fujica ST605 Camera Light Seal Replacement

Fujica ST605 Camera Light Seal Replacement

Camera light seals are straightforward and require no real skill to replace. To prove this my eight-year-old son has achieved camera light seal replacement with great success, under a little guidance of course!

Please do follow the instructions carefully and take great care as you go; knives are sharp and cleaning products can do damage.
As with many online tutorials, please observe the following disclaimer: Milly’s Cameras cannot be held responsible for any accidents or damages to persons or goods, so please use this tutorial at your discretion.

Time Taken; 40 minutes

Tools and Materials needed;

The green lines on the following photos show where the old light seal foam will need cleaning. Usually, I start by placing masking tape over the opening for the shutter curtains. Be careful not to press onto the curtains and focus solely on the outer frame; this helps to stop old sticky light seal foam from entering this area and jamming the curtains.

Fujica ST605 light seal replacement

Then, using the window cleaner or lighter fluid, I start cleaning to begin to soften the light seal foam. Make sure you do not flood the area, rather you just need enough product to help loosen the old foam. With the use of a cloth, start to clean the hinge area and backdoor. Once clean, I use a toothpick to focus on the thin channels (top and bottom of the film compartment). This step is time consuming and can be tricky so be patient and avoid rushing.

Fujica ST605 light seal replacement

The final areas to clean are the door and catch area, as seen in the photo above. Once all of the areas listed are cleaned – with the exception of the mirror damper which we will address later – you are ready to start cutting new light seal foam.

Cutting the light seal foam is relatively simple and doesn’t require a laser cutter, as is sometimes assumed. For the cutting, we will start with the channels and will be using the 1.5mm closed cell for these tracks.

Cutting light seal foam thin strips

There are two main reasons for using the closed cell over any other foam. Firstly, my foam is modern foam that will do the same job as the original foam compared to compression values and also by density in blocking the light. The closed cell also has the added bonus of high resistance to avoid it perishing over time. The other main reason is that it can be easily cut by hand to extremely thin strips; in the case of this camera to 1.75mm in width as seen in the photo’s to the right.

One tip for my customers is to use a scalpel with a new blade and a steel ruler. Using the appropriate tools – and avoiding scissors, craft/hobby knives, kitchen knives or any other inappropriate cutting implement – is my best advice on how to cut the foam successfully.
I begin by cutting the tracks for the top and bottom channels. You will need to use the 1.5mm closed cell foam, cutting two strips 1.75mm wide and 1.48mm long. These will need to be trimmed further to allow for the film counter pin on the top channel and the film canister cut out for the bottom channel.

Fujica ST605 light seal replacement

Cut 9mm off the end of one of the strips and place this piece in the top channel, from the door hinge to the film counter pin. To place these strips in the tracks, remove the adhesive backing and lick the adhesive. This will deactivate the adhesive long enough to allow you to position the foam correctly with the use of a toothpick.

Once the saliva has dried, which will take approximately 20 minutes, the foam can be pushed down so that the adhesive makes contact. Remove 5mm off the rest of the trimmed strip and disregard this small piece. Place the rest of the strip in the top channel, starting from the other side of the camera.

Again use your saliva to deactivate the adhesive and push in using a toothpick. Repeat the above steps for the bottom channels. Cut the strip down to two pieces, one at 1.22mm and the other 17mm long. The 17mm long piece will go from the left hand side to the cut out for the film canister; the other piece will go from the door hinge end back to the cut out.

Next, cut two pieces from the 3mm open cell foam, 49mm x 6.5mm for the door hinge and 49mm x 6mm for the door at the catch end. Remove adhesive backing sheet and stick in place. Please note that there are two small pieces either side of the catch which need to be cut from the 1.5mm foam. The sizes for these are 4mm x 24mm and 4mm x 18mm. To stick these in place, remove the backing and give the adhesive a lick and then position using tweezers. 3mm foam may seem too thick for these areas – and with standard foams it usually is – however my open cell foam has a good compression rate with a minimal stress factor and a high cell count to block light while still compressing down to 0.3mm (-+0.1mm).

Fujica ST605 light seal replacement

The next step is to do the mirror damper foam, which requires great care to be taken. One friend once told me that he placed paper inside the mirror housing to stop old foam from falling inside however I strongly urge you not to do this; this can actually cause more damage than sticky foam will. Having replaced 1000s of mirror damper foam, care and patience is all that is needed to avoid any issues.

Camera mirror damper foam replacement

My technique is to place the camera in one hand and hold it up over scrap paper, high enough for me to see what I am doing. With the other hand, I use a toothpick to scrape the old foam away, letting it fall onto the scrap paper. Once all the lose is removed, I use my scalpel and tweezers to further clean the area. Though do remember to change the scalpel blade and clean the tweezers after using them!

Once clean, cut a replacement piece from the 3mm. The piece should be 38mm x 3mm. Once cut, remove the back, lick and use the tweezers to place the foam in its correct place.

Once this is done, remove the masking/decorator’s tape and give the camera a light clean. And voila! Your Fujica ST605 is finished and ready to load up with film to test.

Click to see test photo’s.

Posted on Leave a comment

Lens Caps Off to Moshi Monsters Holga

Mind Candy and Topps Moshi Monsters Holga Card - Milly's Cameras
Mind Candy and Topps Moshi Monsters Holga Card – Milly’s Cameras

Lens Caps Off to Moshi Monster’s Holga Camera

Mind Candy and Topps has introduced photography to children. Via a variety of media, including television, books, an online website, and a game. Seems, to me, a great way to develop an interest in photography in children of an early age.

Photography is a great skill, it has the ability to make people of all ages more perceptive to their surroundings. Being able to encourage a child to develop this at an early age can only be a good thing, right?

My 8-year-old shouted, “Dad, I have a card with one of your cameras on!” I was pleased to see that he was holding the Holga card from the Techies set. Holga is a Happy Snappy Moshling who likes to take photos and hand them out to other Moshlings. My son has been collecting the now poplar Moshi Monsters game cards, produced by Topps for a while now, (2012). Though, I have a more extensive camera collection in comparison. It seems the cards are a popular choice amongst his age group, which is also good to see.

I have not been able to get him interested in photography, but that has now changed. Thanks to Topps and Mind Candy, he now has his own camera, and a digital camera request for his next birthday.

Lens caps off to Topps and Mind Candy, for their Holga card, thank you!

Update

Even though Moshi Monsters is no longer available, it continues to live on through Moshi Monsters Rewritten. And thousands of people around the world still enjoy this fan-made version of the original online game. Moshi Monsters is a reminder that even when things come to an end, a new start begins.

Play Moshi Monsters Rewritten

Posted on 3 Comments

How to Repair a Leaking Film Developing Tank

Developing Tank Leak Repair

How to Repair a Leaking Film Developing Tank

If you’re a photographer, you know that developing tanks are essential for processing film. But what happens when your developing tank starts to leak? Don’t worry, it seems to be a common problem, and you can fix it yourself with a few simple steps.

Here’s what you’ll need:

  • A leaking developing tank
  • Silicone sealant
  • Masking tape
  • Water and washing liquid solution in small cup
  • A clean cloth

Instructions:

  1. Clean the developing tank thoroughly.
  2. Apply a strip of masking tape along the bottom of the red band on the developing tank.
  3. Apply another strip of masking tape about 5mm below the red band.
  4. Squeeze a bead of silicone sealant in between the two strips of masking tape.
  5. Smooth out the bead of silicone sealant with a wet finger dipped in water and washing liquid solution.
  6. Allow the silicone sealant to dry completely.

Once the silicone sealant has dried, your developing tank will be leak-proof. You can now use it to develop film without worry.

Developing Tank Repair
Developing Tank Fix
Developing Tank No More Leaks

Here are some additional tips for repairing a leaking developing tank:

  • Make sure the developing tank is clean before you start. Any dirt or debris can interfere with the bonding of the silicone sealant.
  • Apply the silicone sealant evenly. A thick bead of silicone sealant will take longer to dry and may not be as effective as a thin bead.
  • Smooth out the silicone sealant with your finger. This will help to create a smooth, even surface that will be less likely to leak.
  • Allow the silicone sealant to dry completely before using the developing tank. This will ensure that the sealant is fully cured and that the developing tank is leak-proof.

By following these simple steps, you can easily repair a leaking developing tank and get back to developing film.